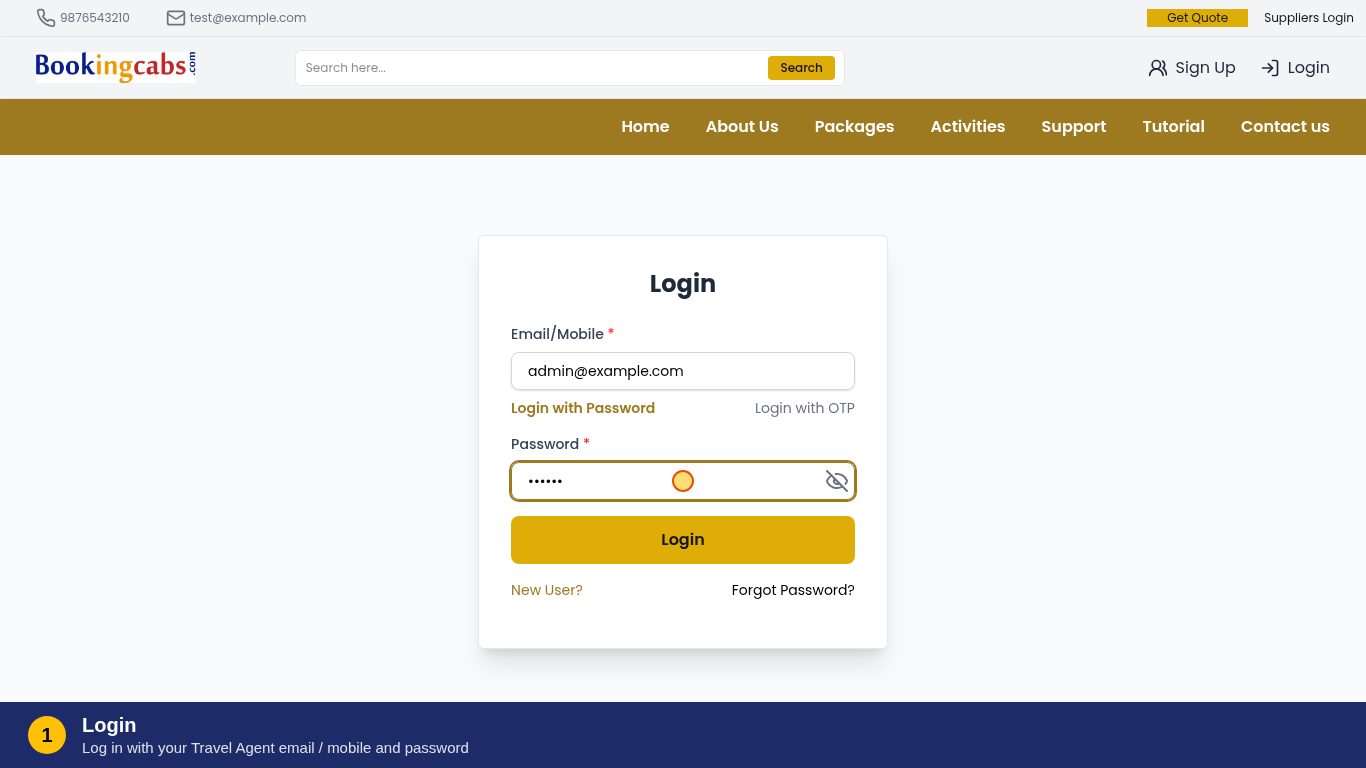
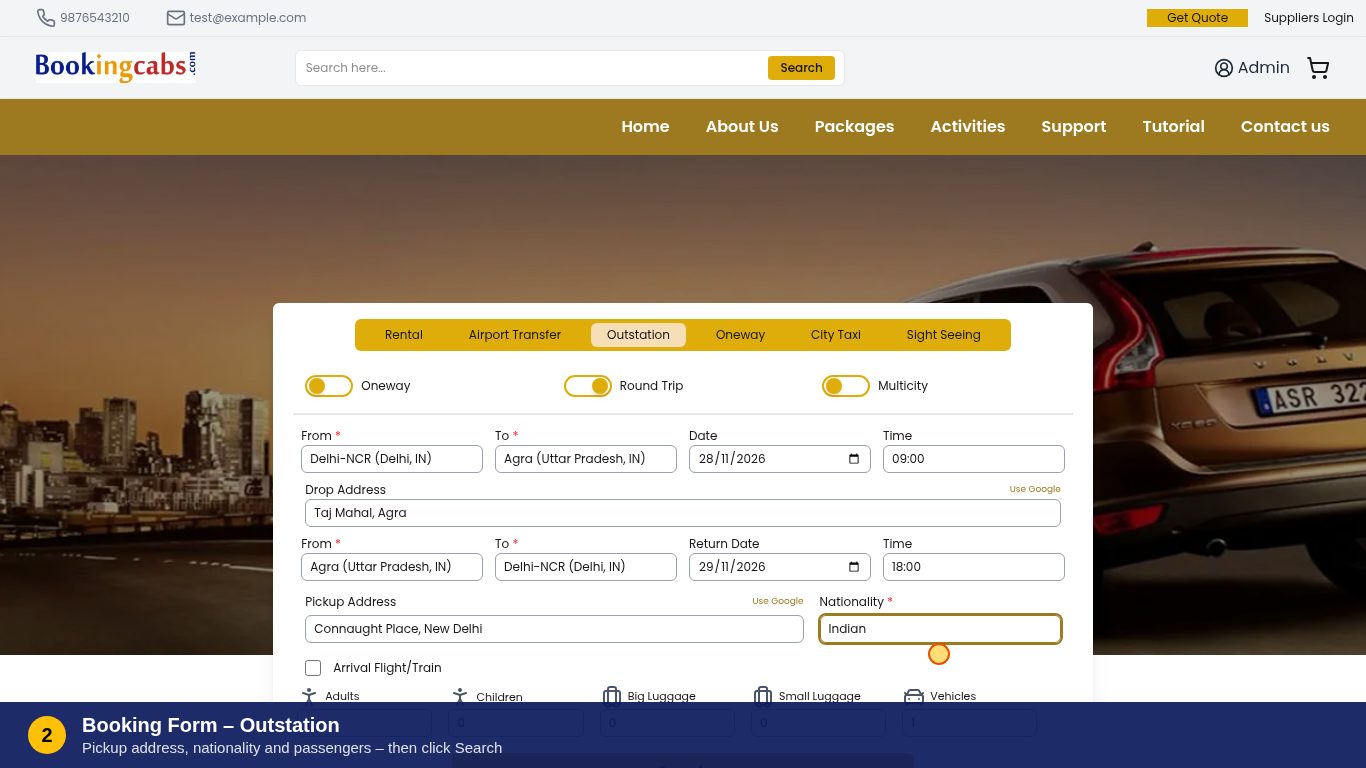
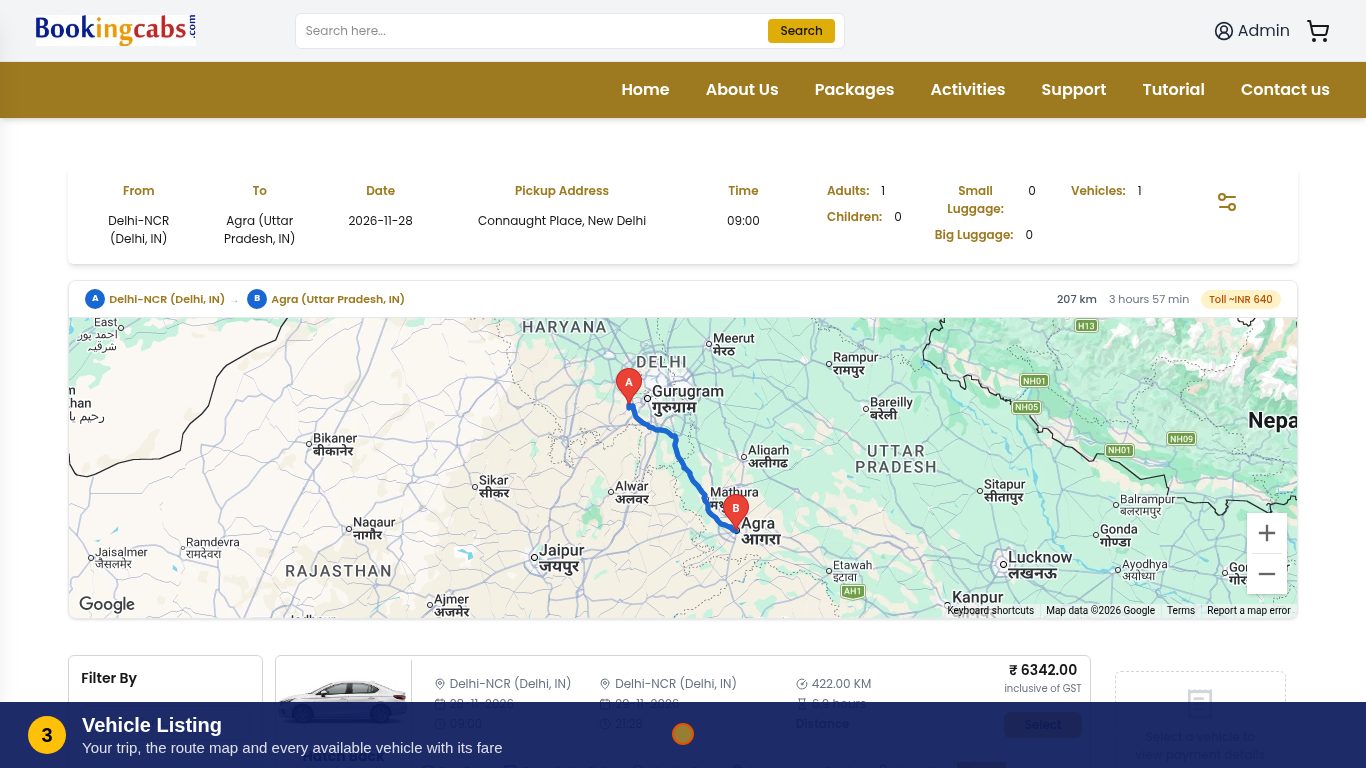
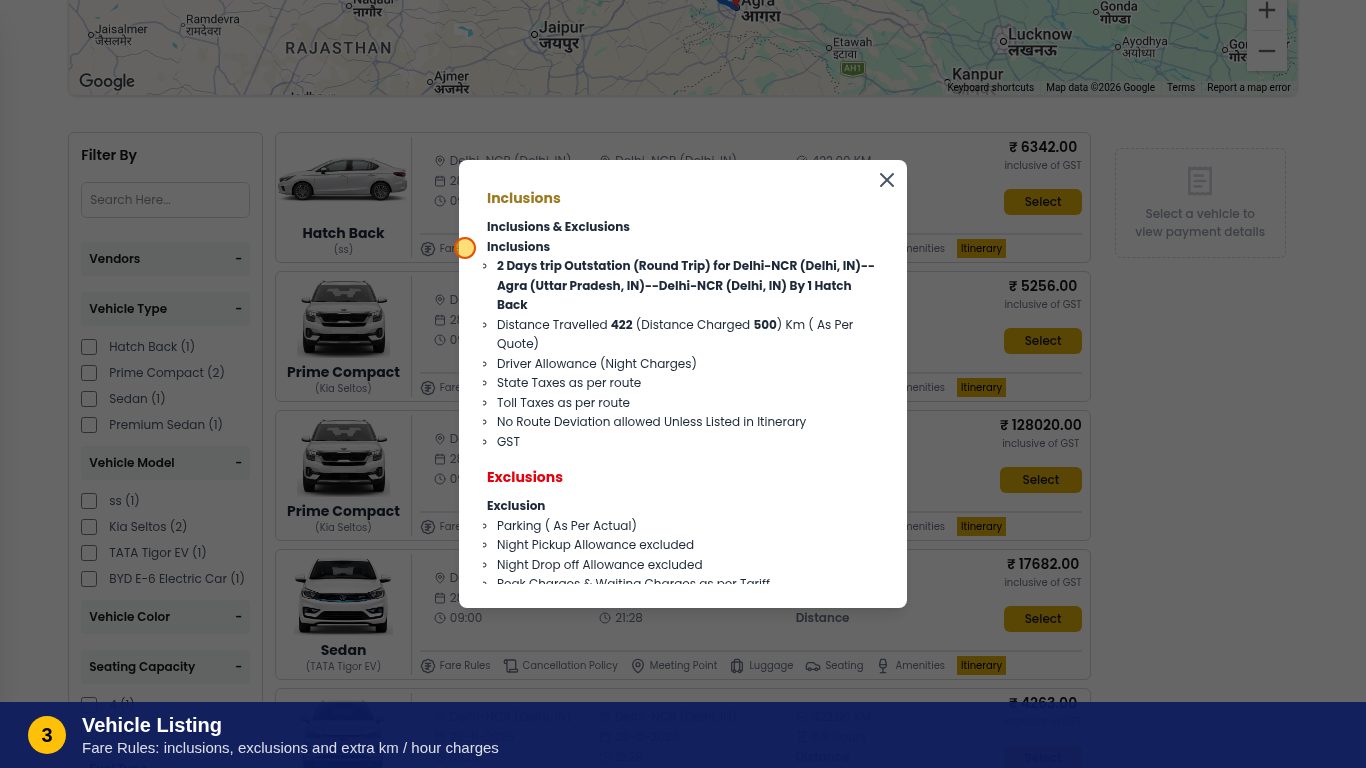
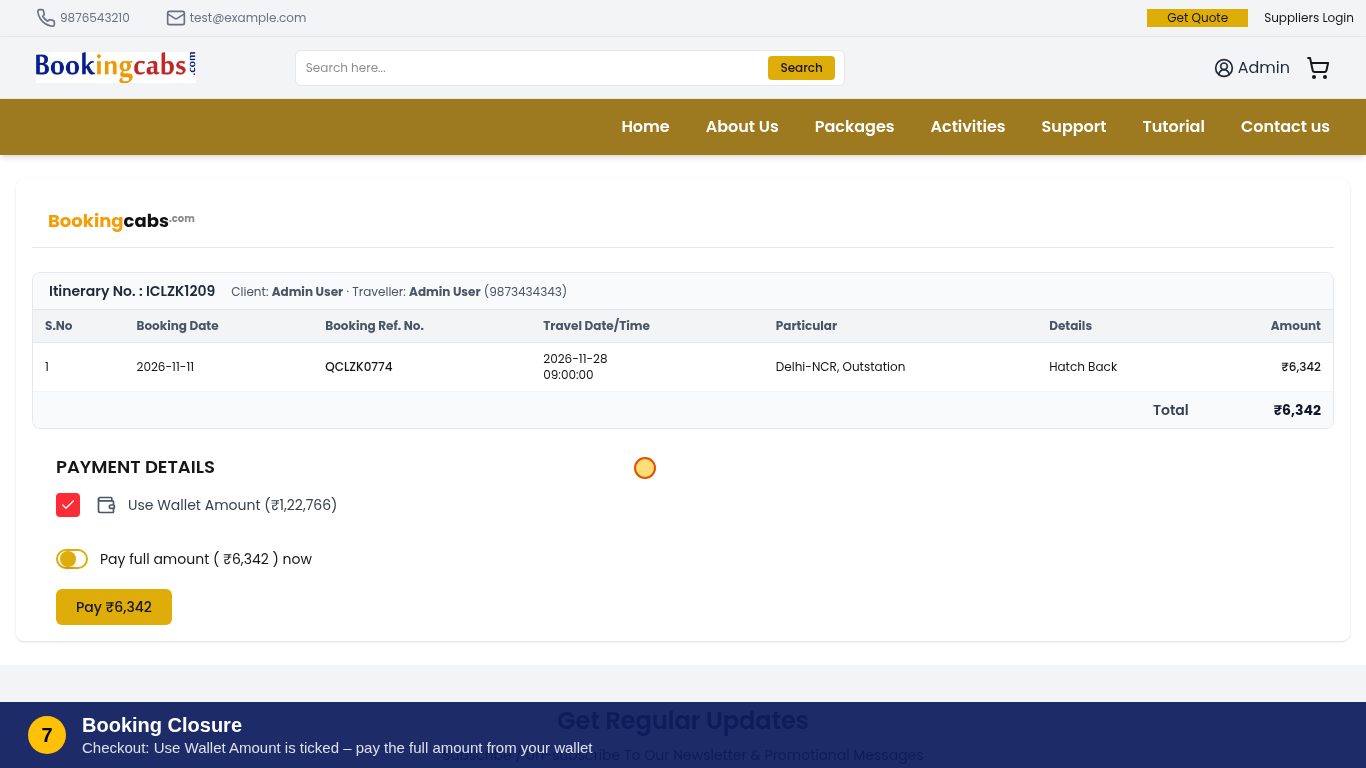
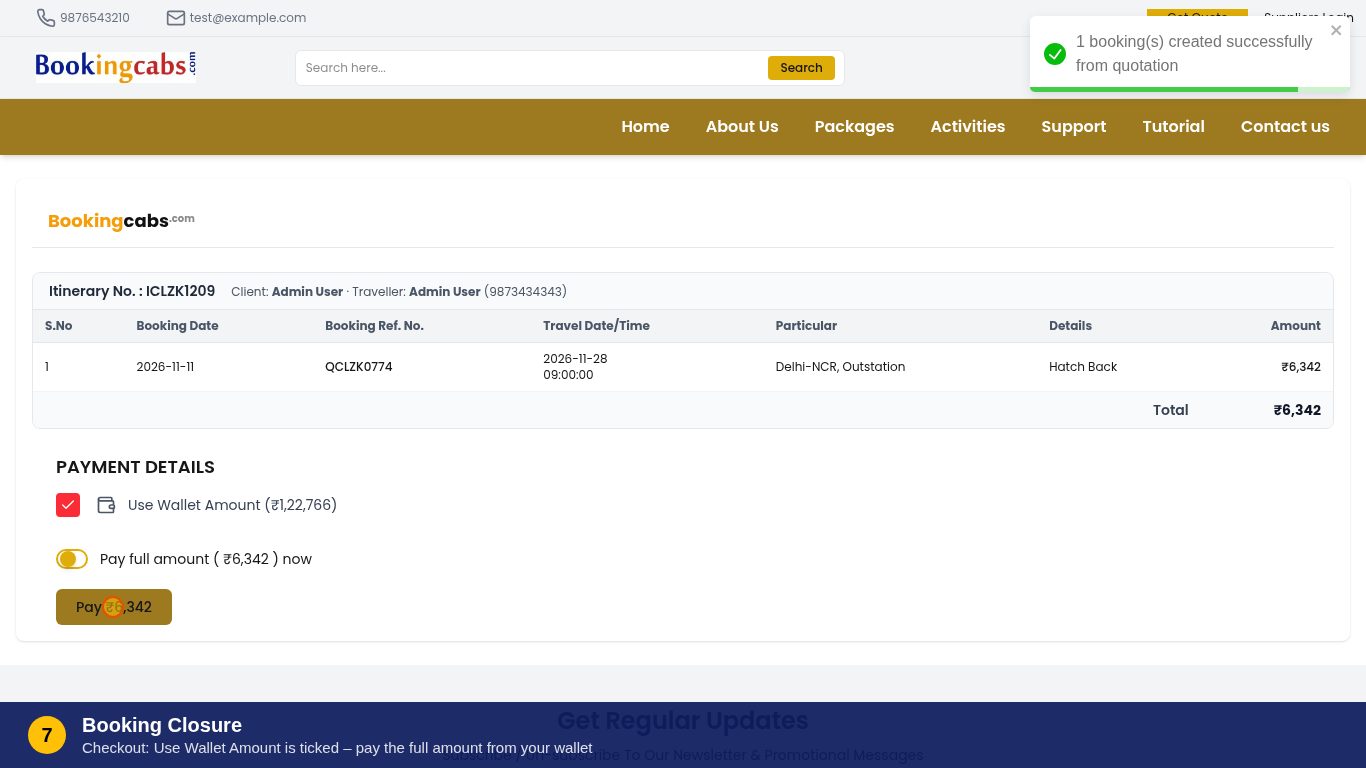
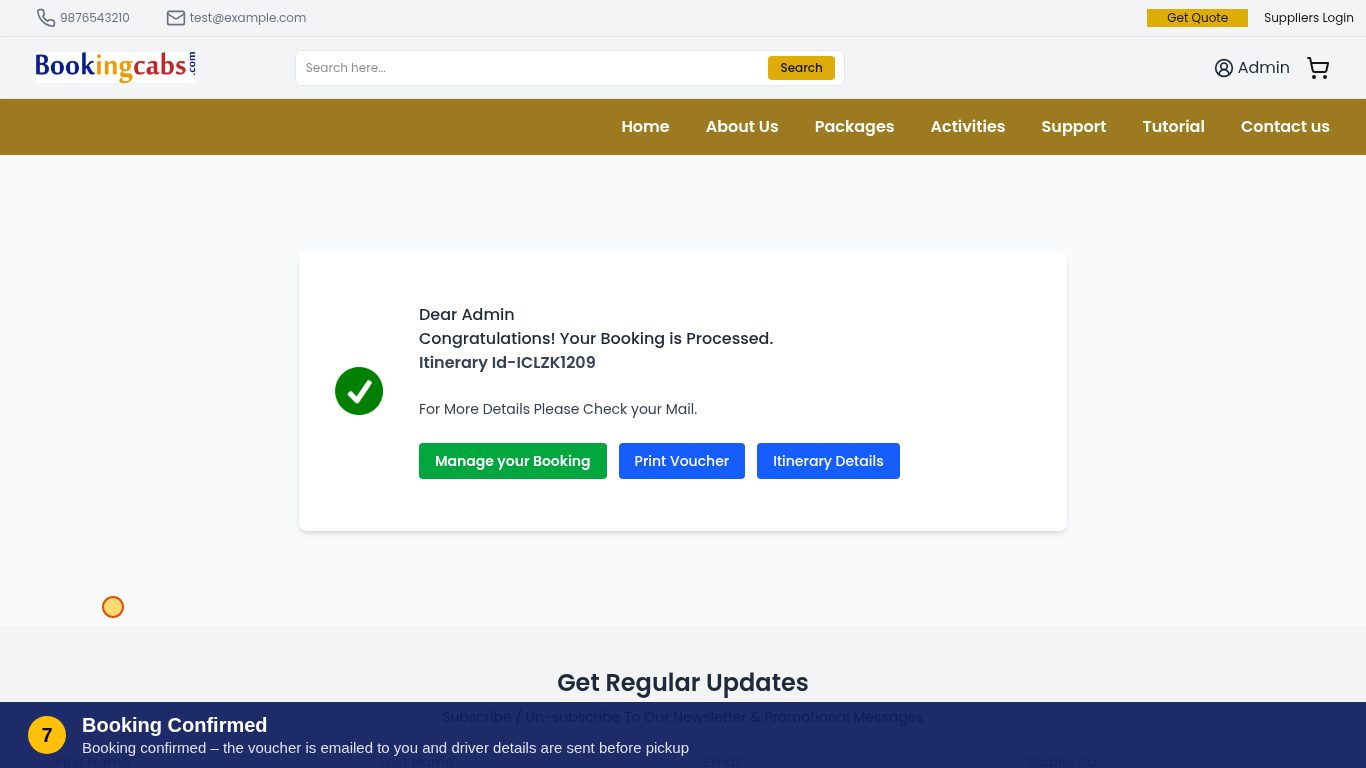
Watch a full booking from start to finish: Login → Outstation booking form → Vehicle Listing → Traveller Page → Hold On → Quotation → Booking Closure. Each step is explained in the caption bar at the bottom of the video.
Every step of the video (click a picture to enlarge it)
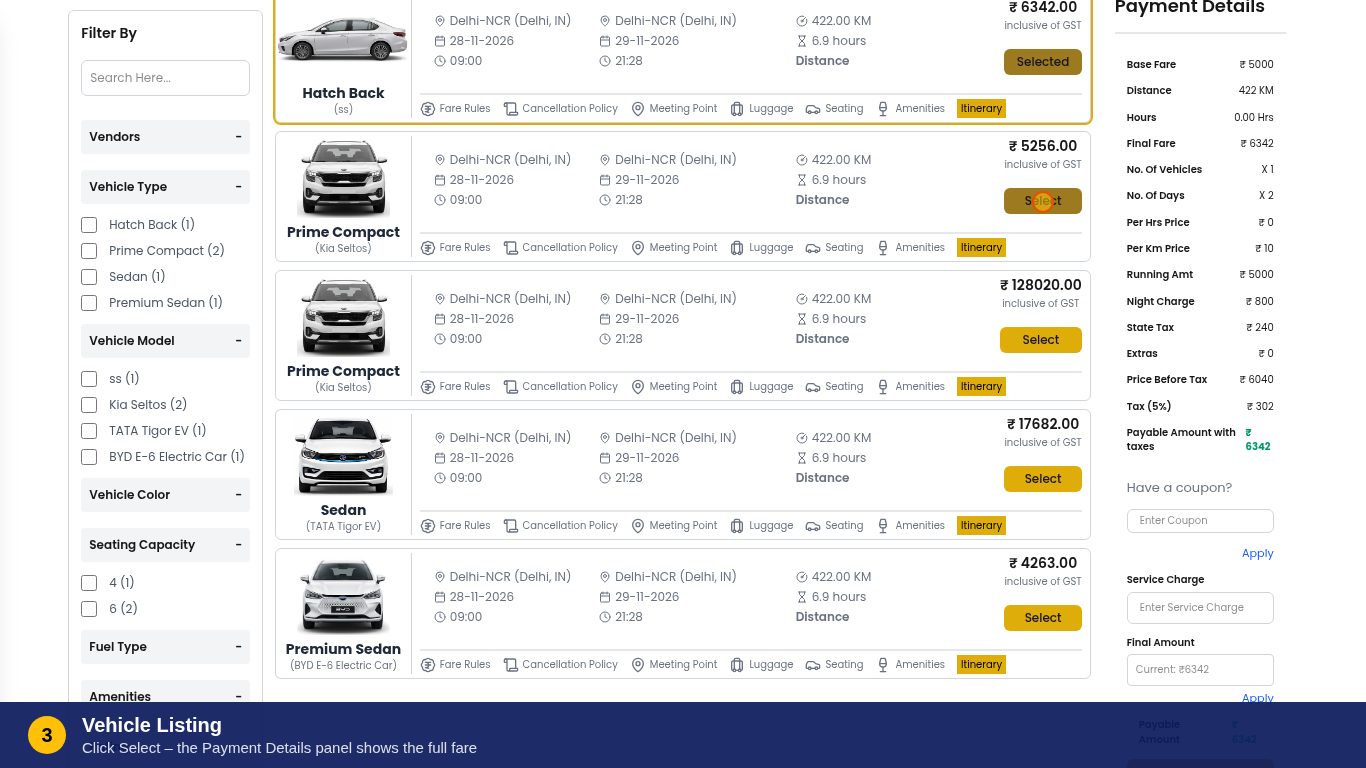
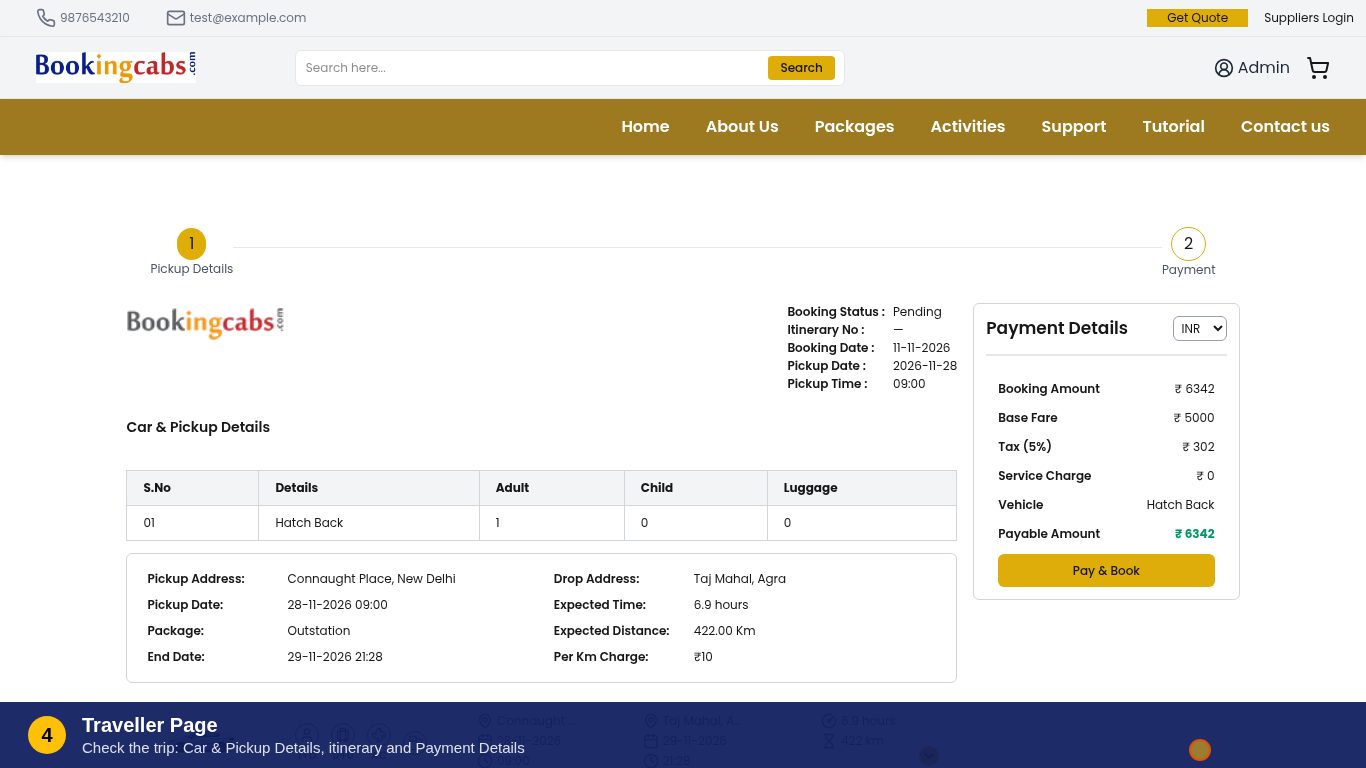
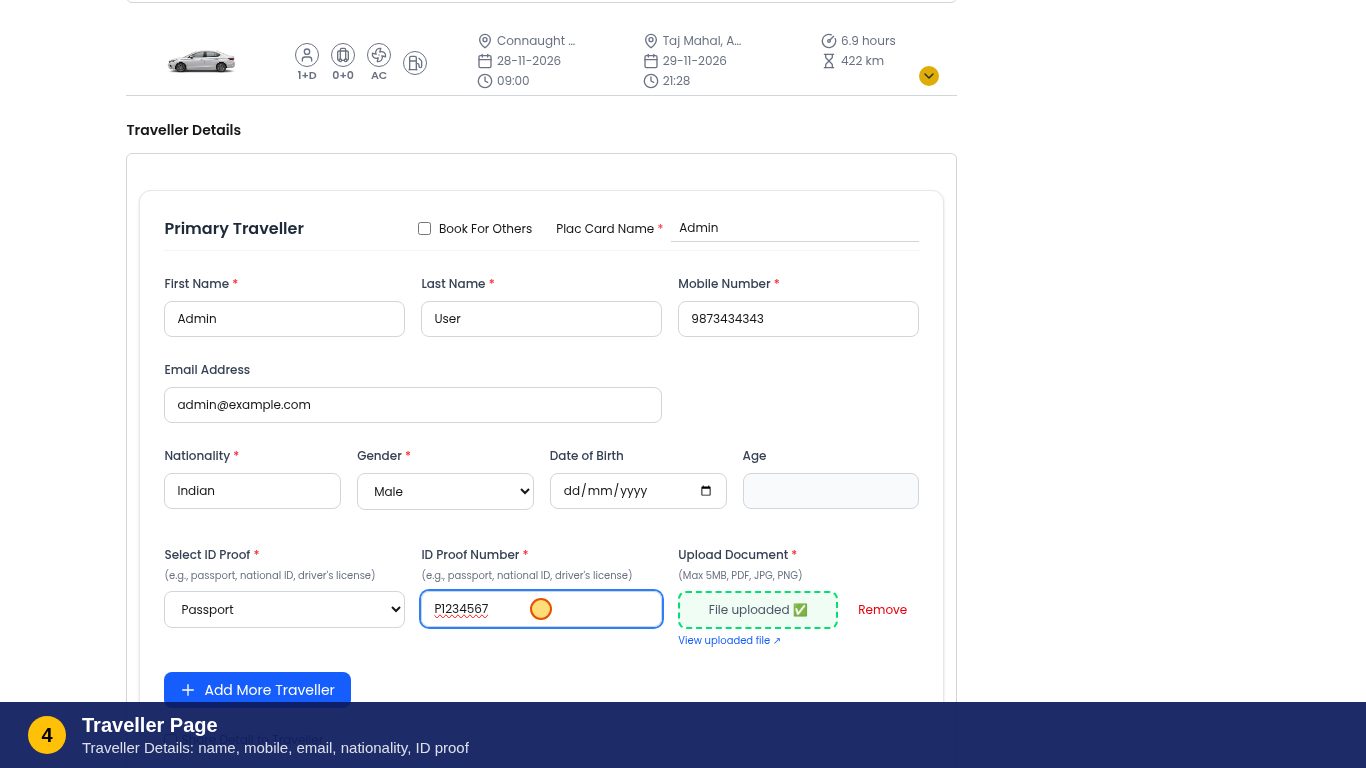
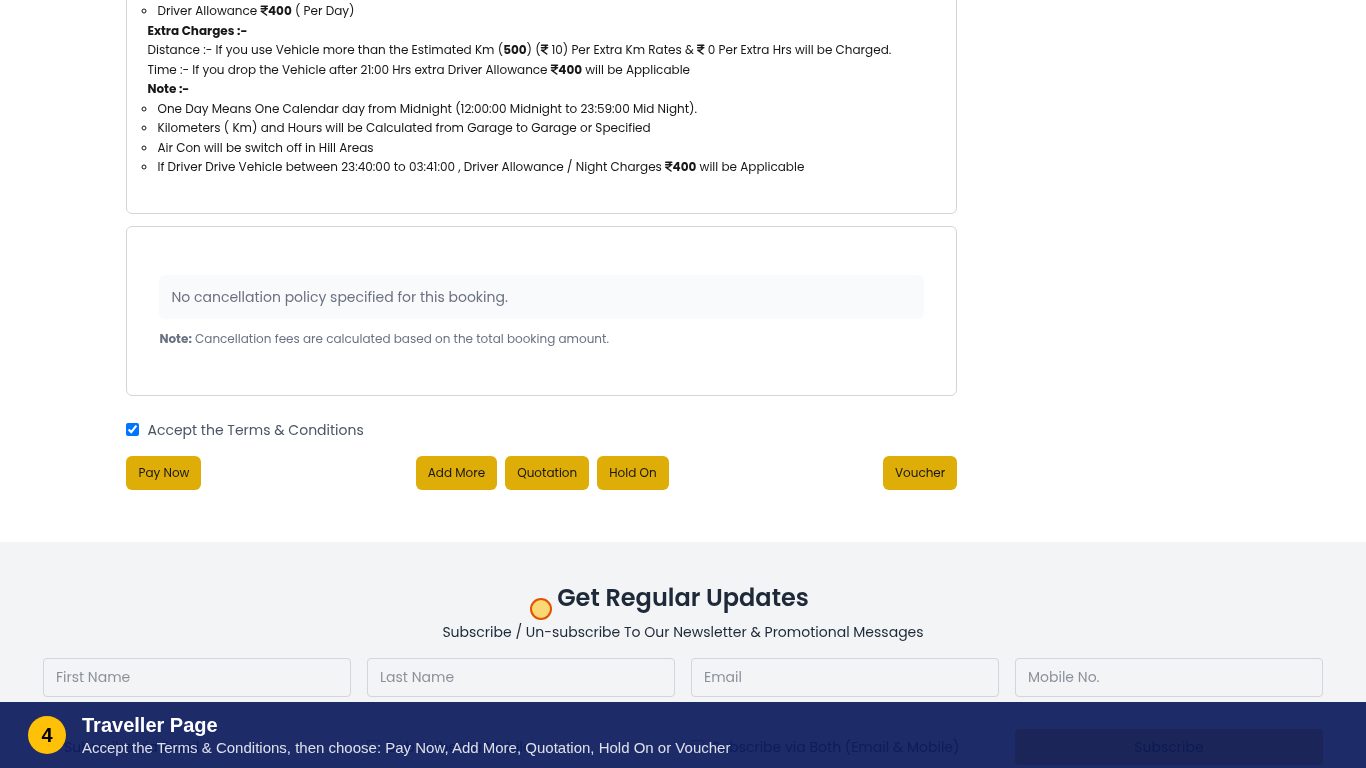
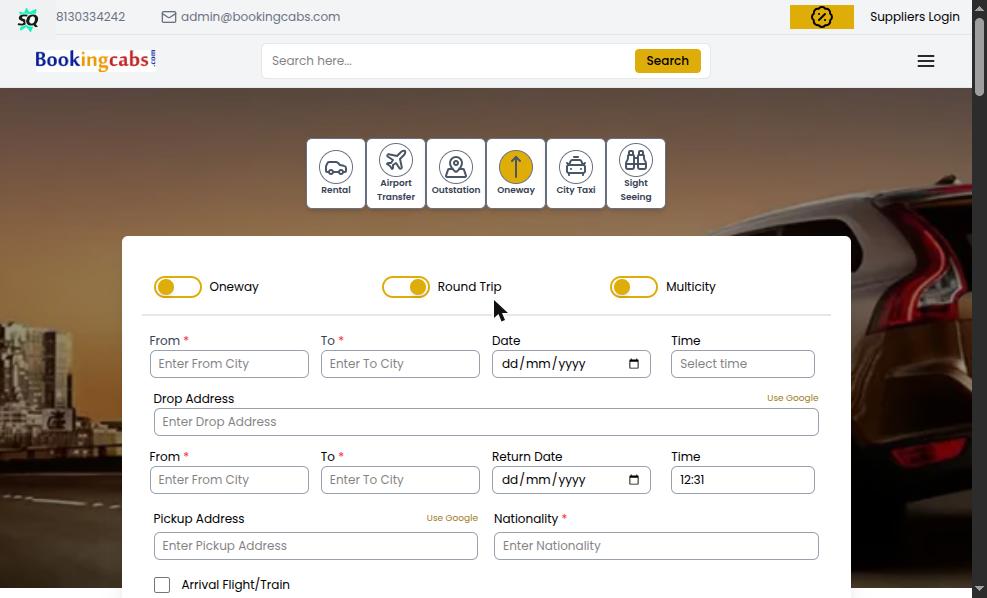
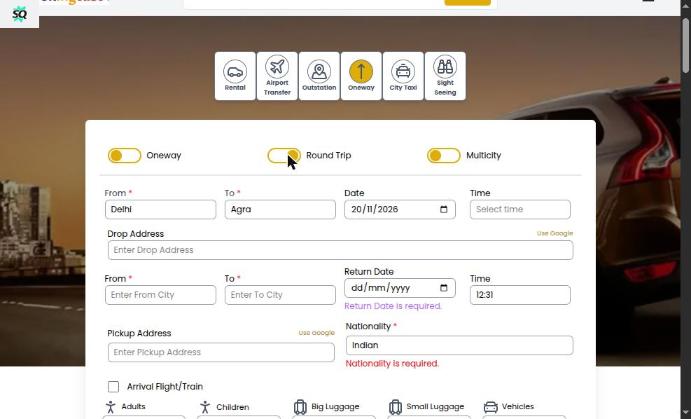
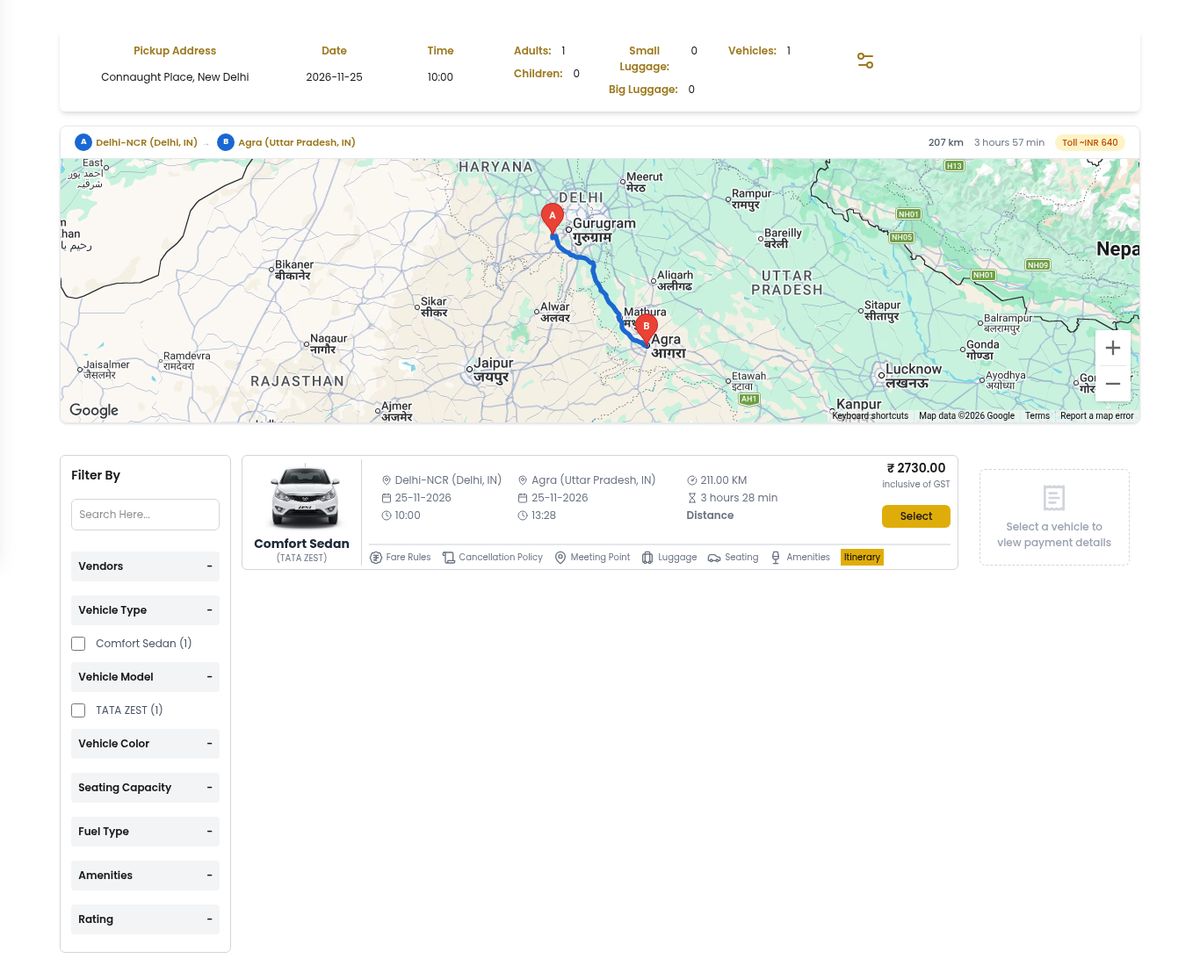
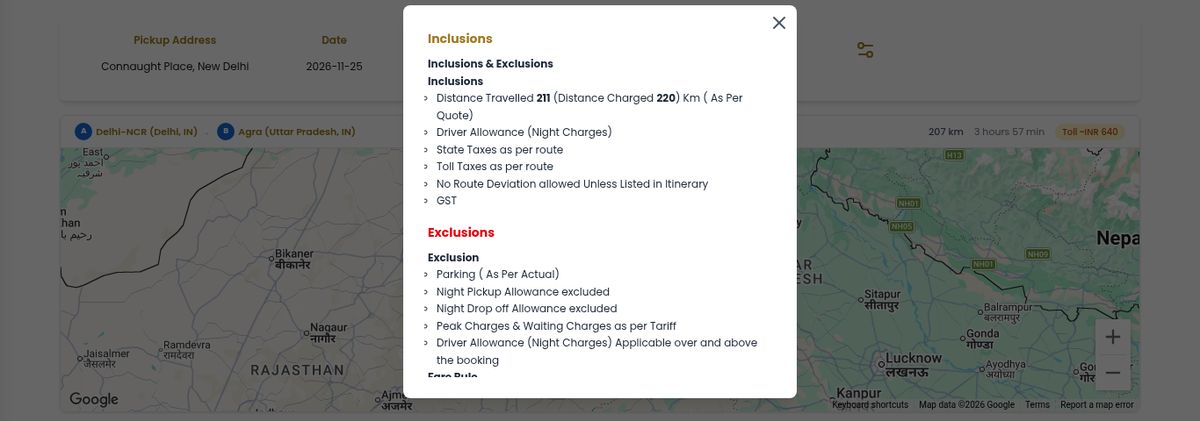
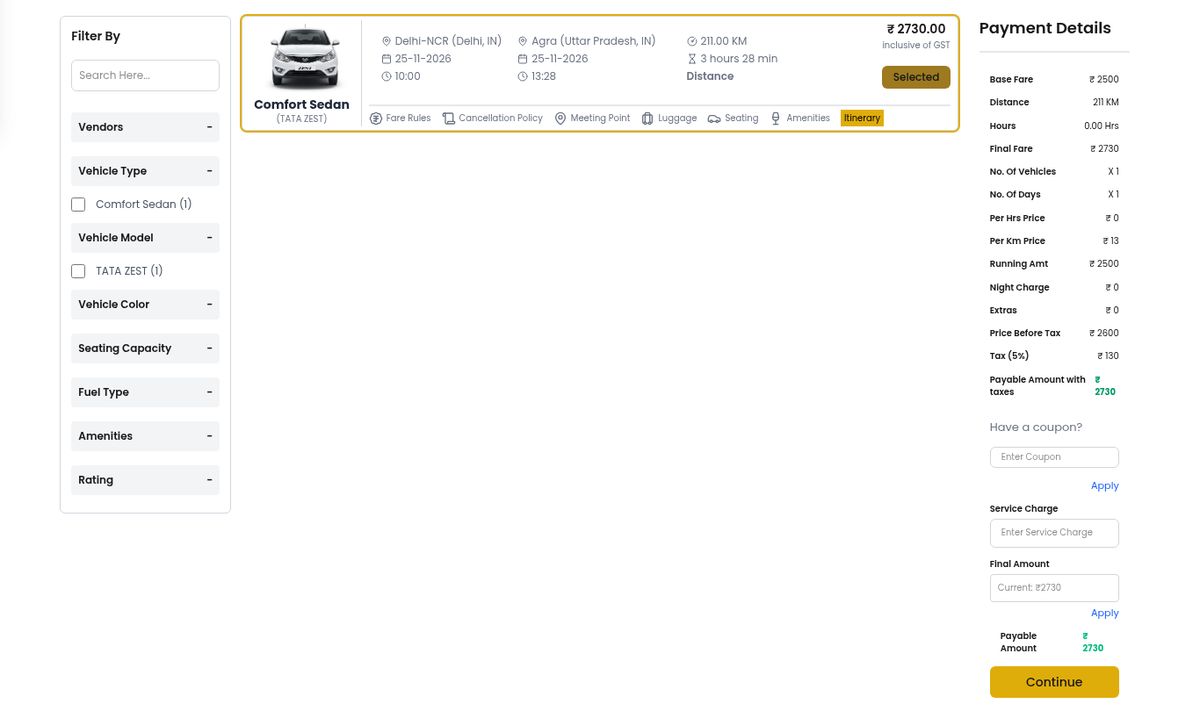
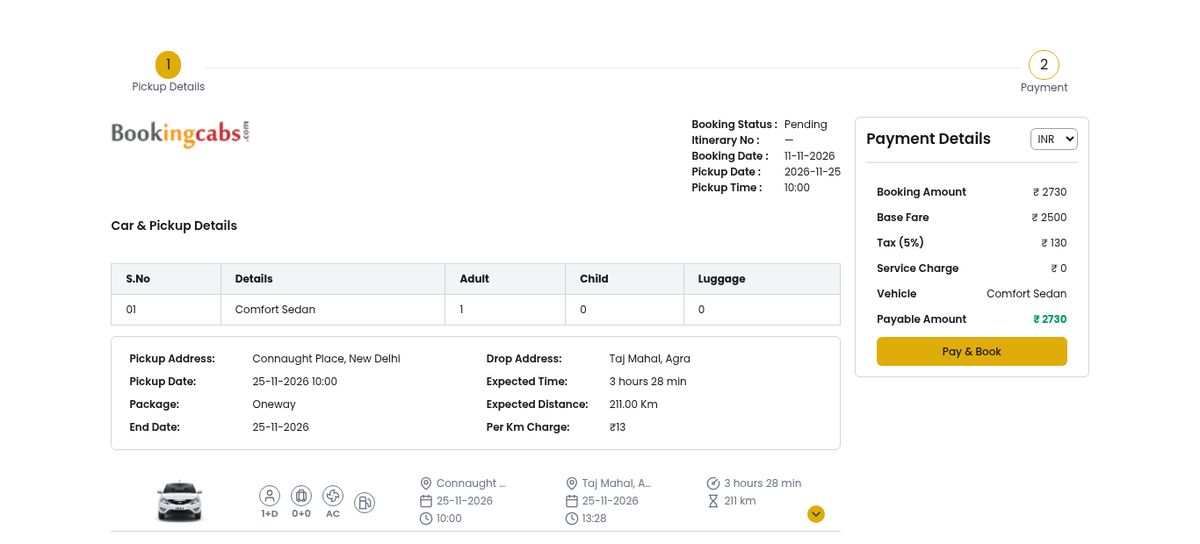
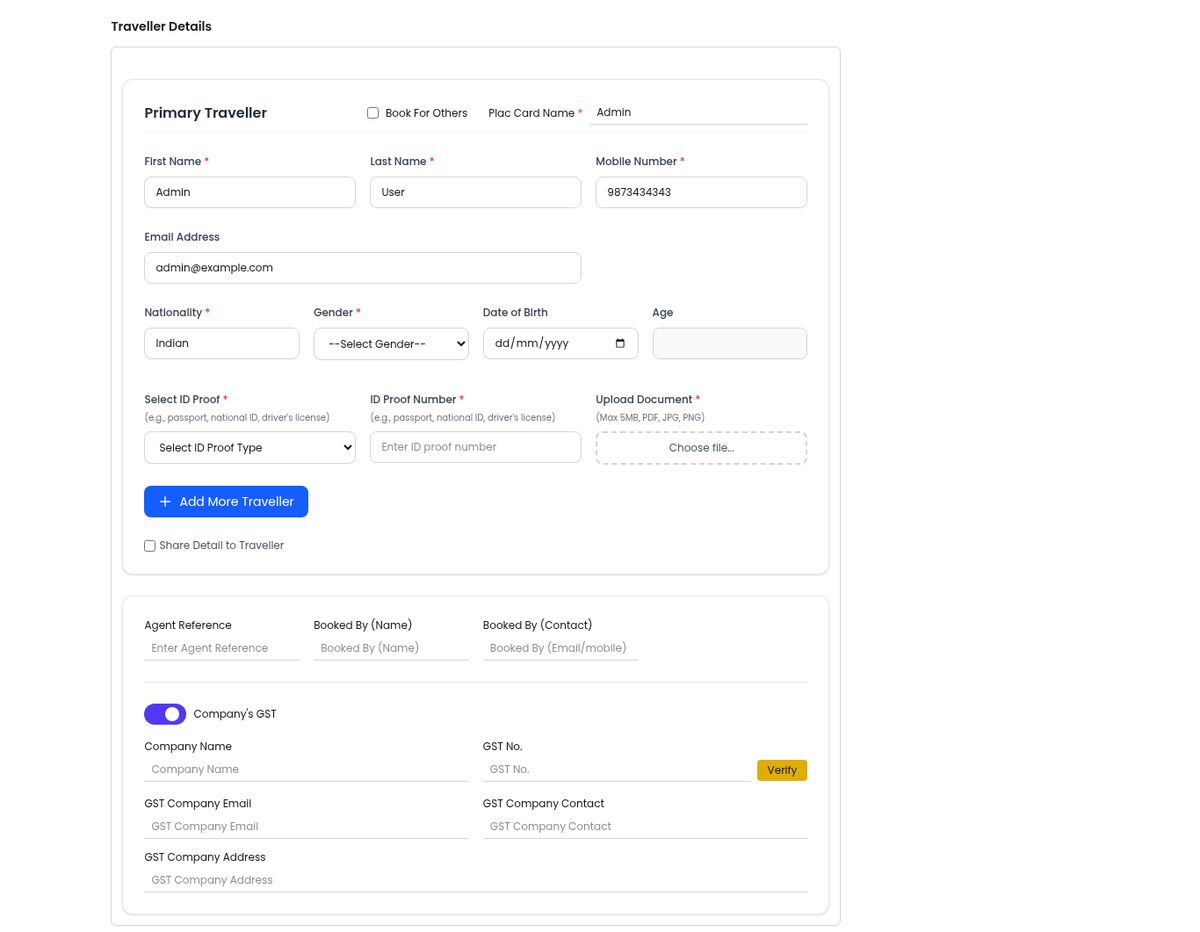
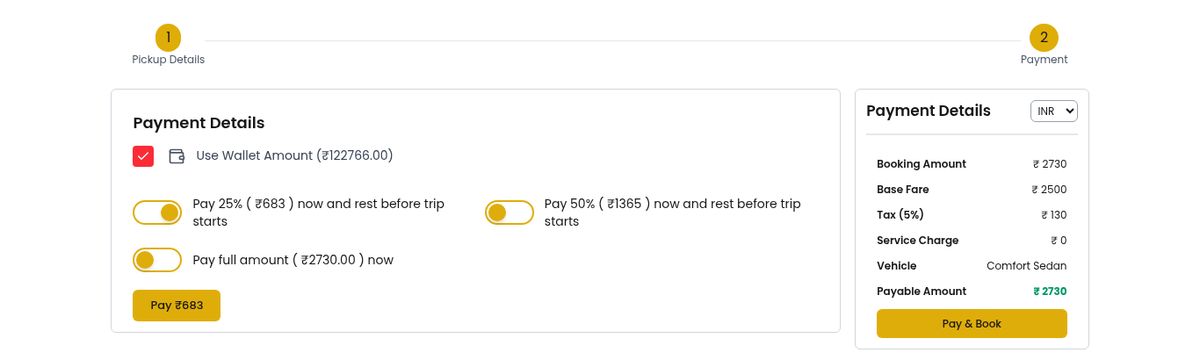
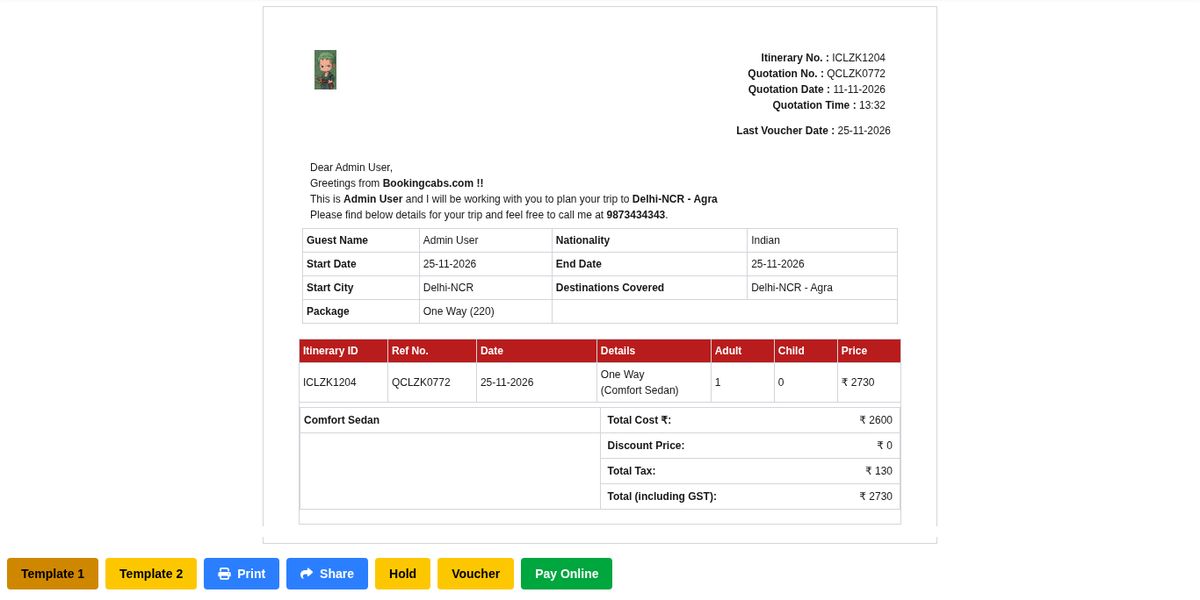
1 · Login Log in with your Travel Agent email / mobile and password.2 · Booking Form – Outstation Round Trip: Delhi → Agra and back, dates, times, pickup address and nationality, then Search.3 · Vehicle Listing Your trip, the route map and the vehicles with their fares.3 · Fare Rules Inclusions, exclusions and the extra km / hour charges.3 · Payment Details Select a vehicle to see the full fare. Agents can add a Service Charge, then click Continue.4 · Traveller Page – Trip Car & Pickup Details, itinerary and the Payment Details box.4 · Traveller Details Name, mobile, email, nationality, gender and ID proof.4 · Choose the Next Step Accept the Terms, then Pay Now, Add More, Quotation, Hold On or Voucher.5 · Hold On The booking is held until the Last Cancellation Date.5 · Hold Booking Buttons Print, Share, Confirm & Pay or Voucher – later, or from My Hold Bookings.6 · Quotation The quotation with the trip, vehicle and price.6 · Quotation Buttons Template 1 / 2, Print, Share, Hold, Voucher and Pay Online.7 · Booking Closure – Checkout Pay Online opens the Checkout. Use Wallet Amount is ticked.7 · Pay Pay the full amount from your wallet.7 · Booking Confirmed The booking is processed. Manage your Booking, Print Voucher or open the Itinerary Details.
01
Registration Process
Bookingcabs.com supports two types of registrations: User (which includes Travel Agents) and Supplier (vehicle/service providers). This section covers both.
1 Open the Website & Navigate to Sign Up
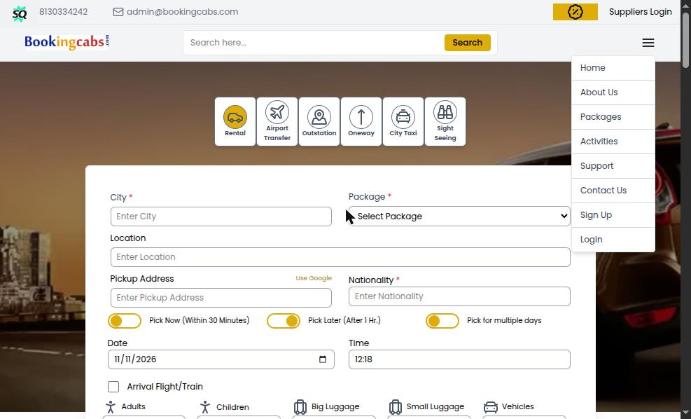
Go to https://www.bookingcabs.com. On a desktop, the Sign Up and Login buttons are in the header. On a mobile, tap the menu icon (☰) in the top-right corner. The menu has Home, About Us, Packages, Activities, Support, Contact Us, Sign Up and Login.
💡 Suppliers who already have an account can click Suppliers Login in the top bar. It opens the B2B supplier portal.
Navigation menu showing Sign Up and Login options
2 Choose Registration Type: User or Supplier
The registration page has two tabs at the top:
User (blue tab) – for individual users, Travel Agents, Corporate clients, CRM users
Supplier (yellow tab) – for cab operators and service providers
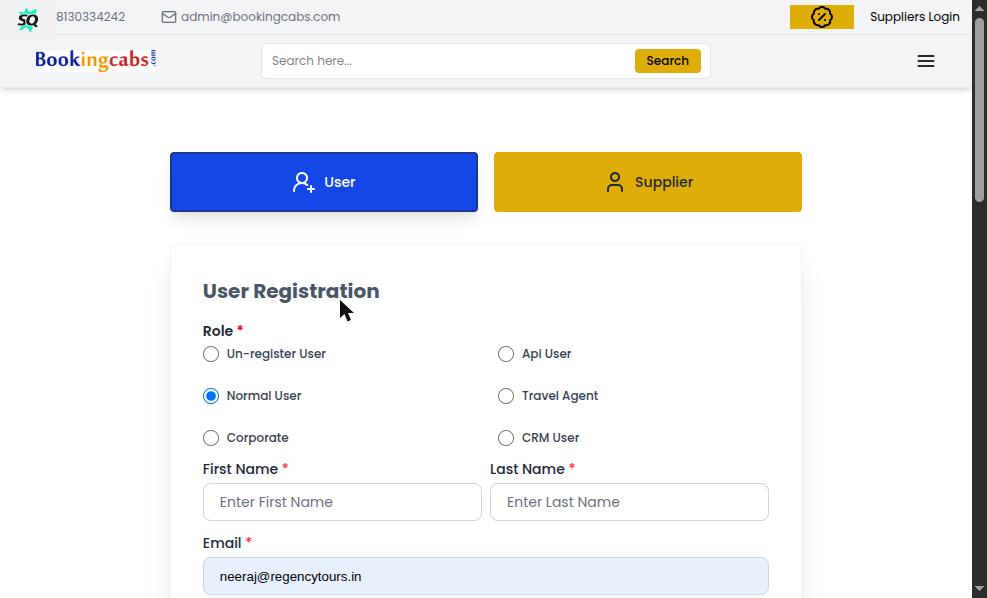
Under the User tab, you will see the User Registration form with a Role selection field.
User Registration form – choose User tab or Supplier tab
3 Select Your Role
Under the User Registration section, choose the appropriate Role:
Available User Roles:
Un-register User – Guest / unregistered browsing
Normal User – Regular registered customer (default selected)
Corporate – Corporate/business accounts
Api User – For API integrations
Travel Agent – Select this for Travel Agent registration
CRM User – Internal CRM/relationship manager access
💡 Travel Agents should select the "Travel Agent" radio button to get access to agent-specific features, quotation management, and commission structures.
Fill in First Name, Last Name, and Email in the fields that appear below the role selection.
Corporate, Travel Agent & Hotel: These roles also show Company fields. Enter your company details there. Travel Agents also get an Affiliate ID field.
4 Complete Registration Details & Submit
Scroll down to complete the remaining required fields and click Register:
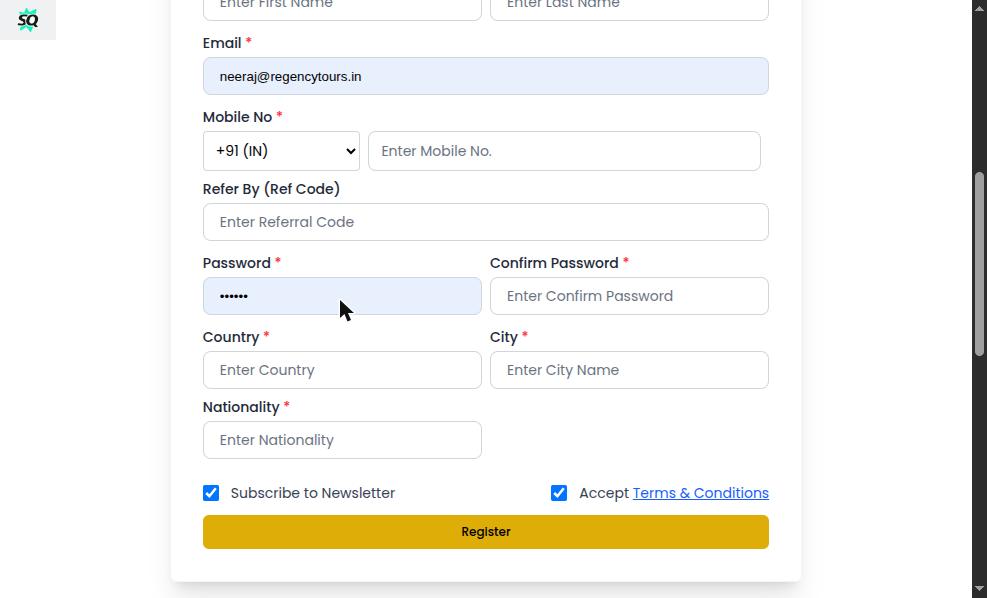
Lower portion of Registration form – fill in all required fields and click Register
Fields to complete:
Email – Your email address (used for login)
Mobile No – With country code (e.g., +91 for India)
Refer By Code – Optional referral code. If a friend sent you a referral link, this is filled in for you (see Refer & Earn)
Password & Confirm Password – Set a secure password
Country & City – Your location
Nationality – Your nationality
Subscribe to Newsletter – Optional checkbox
Accept Terms & Conditions – Must be checked to proceed
Note: After registration, you will receive a confirmation email. Log in using your email and password to access the platform.
🏢 Supplier Registration
5 Register as a Supplier (Vehicle/Service Provider)
Click the Supplier tab (yellow) on the registration page. The Supplier Registration form offers the following supplier types:
Supplier Types available:
Cab Supplier – Cab/taxi fleet operators
Hotel Supplier – Hotel and accommodation providers
Activity Supplier – Tour activity organizers
Bus Supplier – Bus fleet operators
Flight Supplier – Flight booking providers
Boat Supplier – Boat/ferry service operators
Train Supplier – Train booking providers
Fill in all required details including Company Name, Contact Person, Email, Mobile, and upload necessary documents. Click Register to submit.
Note: Supplier registrations are reviewed by the Bookingcabs.com team. You will be notified once your account is approved and activated.
02
Booking Process
Bookingcabs.com offers multiple booking types. All bookings start from the homepage. The booking flow follows: Search → Vehicle Listing → Traveller Page → Pay Now / Add More (Cart) / Quotation / Hold On → Booking Voucher.
🚗 2A. Local Rental / Sightseeing Booking
1 Select the Rental Tab
On the homepage, the booking form defaults to the Rental tab. You can switch between booking types using the icons at the top of the form: Rental, Airport Transfer, Outstation, Oneway, City Taxi, Sight Seeing.
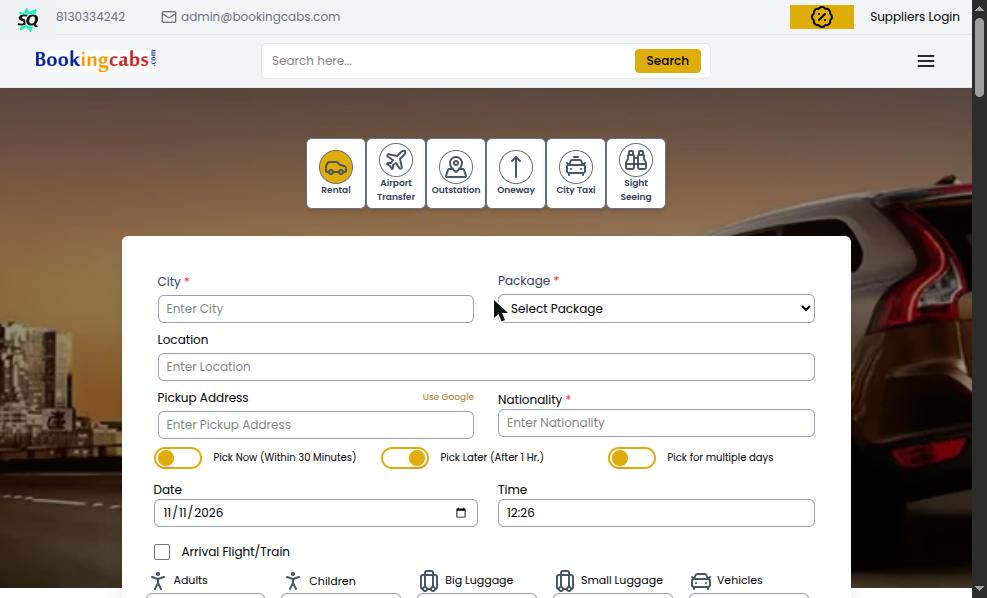
Homepage hero with Rental booking form – the default booking type
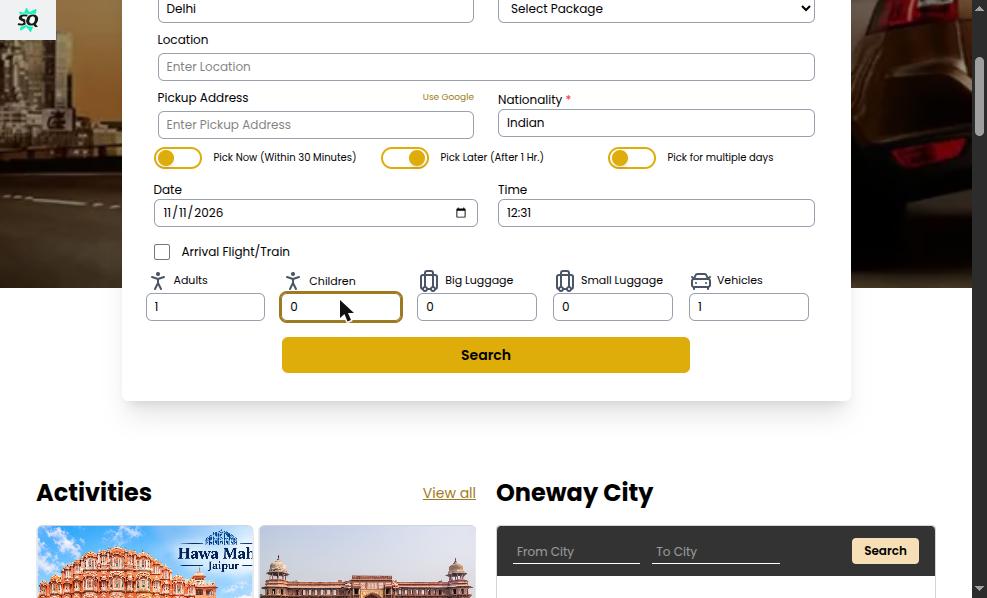
2 Fill in the Rental Booking Form
Complete the following fields in the Rental form:
Rental Form Fields:
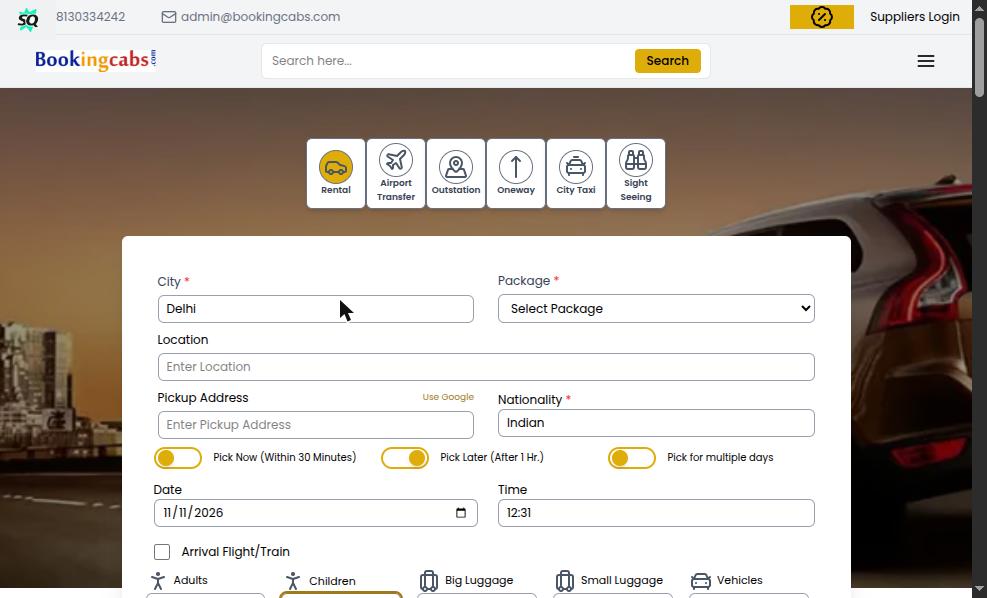
City * – Start typing and select from the autocomplete list (e.g., Delhi)
Package * – Select package once city is chosen (e.g., 4 hrs / 40 km)
Location – Area within the city
Pickup Address – Full pickup address (Use Google Maps integration)
Nationality * – Enter your nationality (e.g., Indian)
Pick Now / Pick Later – Toggle for immediate or scheduled pickup
Pick for multiple days – Toggle for multi-day rentals
Rental form with City set to Delhi – ready to search
💡 City names must be selected from the dropdown autocomplete – you cannot type free text. The package options load automatically after a city is selected.
3 Search for Vehicles
Once all required fields are filled, scroll down and click the Search button. The system will show available vehicles for your rental requirements.
Rental form bottom showing Activities section and Search button
✈️ 2B. Airport Transfer Booking
4 Select Airport Transfer Tab
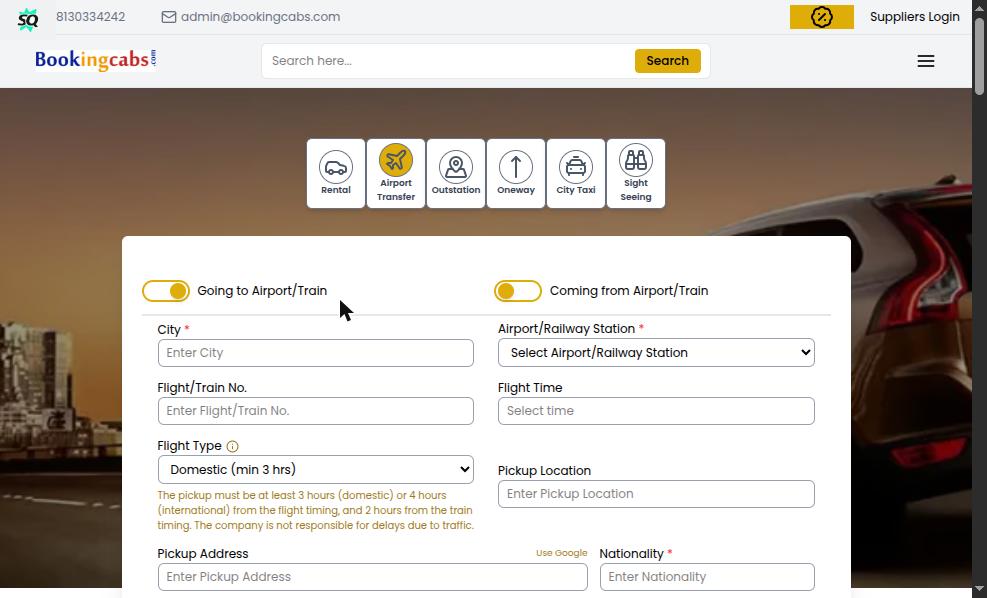
Click Airport Transfer in the booking type tabs. The form has two modes – toggle between them using the top buttons:
Going to Airport/Train – You are heading TO the airport/station
Coming from Airport/Train – You are ARRIVING from the airport/station
Airport Transfer form showing both modes: Going to Airport and Coming from Airport
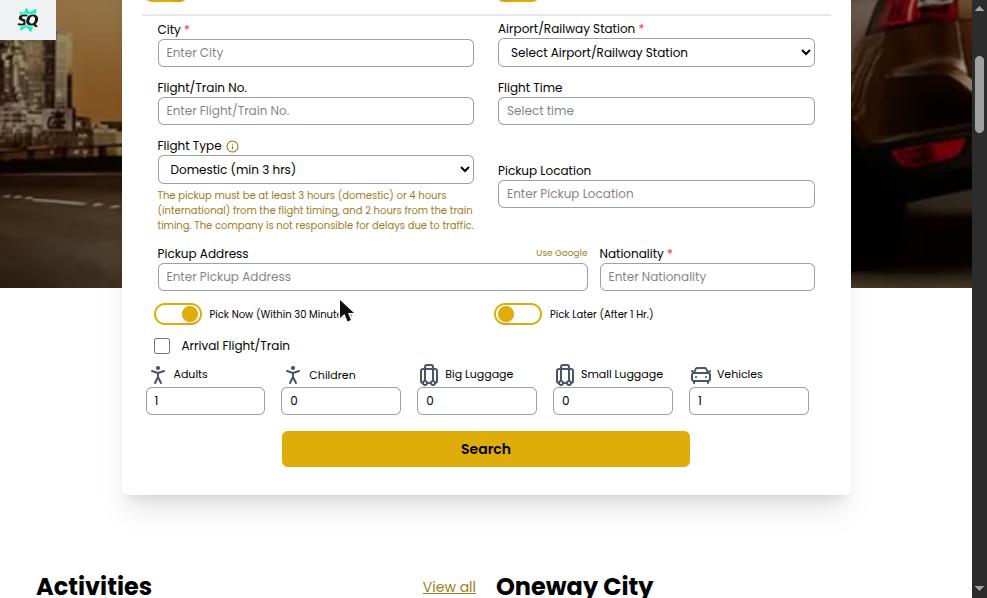
5 Fill in Airport Transfer Details
Complete the Airport Transfer form fields and click Search:
Airport Transfer Form Fields:
City * – City of travel (select from autocomplete)
Airport/Railway Station * – Select the specific airport or station
Flight/Train No – Your flight or train number
Flight Time – Scheduled departure/arrival time
Flight Type – Domestic (minimum 3 hrs) or International (minimum 4 hrs)
Pickup Location – Location within the city
Pickup Address – Full pickup address (Use Google Maps)
Nationality * – Your nationality
Arrival Flight/Train details – For arriving passengers
Every cab booking goes through the same pages. Each one is explained below.
① Vehicle Listing – choose a vehicle and see its fare
② Traveller Page – check the trip and enter the traveller details, then pick Pay Now, Add More, Quotation, Hold On or Voucher
③ Payment – pay online or from your wallet
④ Quotation Page – print or share a quotation
⑤ Shopping Cart and ⑥ Cart Checkout – book several trips together
⑦ Hold Page and ⑧ Booking Confirmed
🚘 2D. Vehicle Listing Page
9 Vehicle Listing – Compare and Choose a Vehicle
After you click Search, the Vehicle Listing page opens. Outstation, Oneway and Airport trips show one list of vehicle types. Local Rental shows a list of individual cars.
Vehicle Listing – trip summary, route map, Filter By on the left and the vehicle cards
What you see on the page:
Search bar (top) – your trip: Package, From / To or Pickup City, Date, Time, Pickup Area and Pickup Address. Click Modify Search to change it without going back
Filter & Sort – narrow the list by Vendors, Vehicle Type, Vehicle Model, Vehicle Color, Seating Capacity, Fuel Type, Amenities and Rating. Use Search Here… to find a value, then Apply (or Clear)
Vehicle cards – photo, vehicle type and model, seating, luggage and the fare (inclusive of GST)
Card tabs – Fare Rules (what is included and the extra km/hour rates), Cancellation Policy, Meeting Point and Itinerary
Click Fare Rules on a vehicle card to see the inclusions, exclusions and extra charges
Payment Details panel (right side):
Select a vehicle to see the fare broken down:
Base Fare, Distance / Hours, Per Km Price / Per Hrs Price
No. Of Vehicles and No. Of Days
Night Charge, State Tax, Toll Tax and Extras
Price Before Tax and Payable Amount with taxes
Have a coupon? – enter a coupon code and click Apply
Service Charge – Travel Agents can add their own service charge on top
Click Continue to go to the Traveller page. If you are not logged in, the button says Login to Continue.
Click Select on a vehicle: the Payment Details panel shows the fare breakdown and the Continue button
💡 "No vehicles found"? Clear some filters, or click Modify Search and try another date, time or package.
🧑🤝🧑 2E. Traveller Page (Pickup Details)
10 Check the Trip
The steps at the top show Pickup Details → Payment. On the first step, check your trip:
Last Cancellation Date (in red at the top) – the last date you can cancel for free. A hold stays open until this date
Car & Pickup Details – one row per trip: Pickup Address, Pickup Date and Time, Package, End Date and Time, Drop Address, Expected Time, Expected Distance, Per Km Charge, plus Adult / Child / Luggage. Click Edit to change a row. For a rental, the drop address is the pickup address unless you change it
Itinerary – the vehicle and the day-by-day route
Meeting Point, Fare Rules and Cancellation Policy
Traveller page – booking summary, Car & Pickup Details, itinerary and the Payment Details box
11 Enter the Traveller Details
Traveller Details form:
Primary Traveller – filled in with your own details. Tick Book For Others to book for someone else
First Name, Last Name, Mobile Number, Email Address, Nationality – required
Plac Card Name – the name the driver shows on the placard at pickup (useful for airport pickups)
Gender, Date of Birth, Age – optional
ID Proof – Passport, National ID or Driver's License, the ID number, and Upload Document
Add More Traveller – add the other passengers
Share Detail to Traveller – tick this to send the booking details to the traveller too
Agent Reference – your own reference number (Travel Agents), plus Booked By (Name) and Booked By (Contact)
Company's GST – switch on to enter Company Name, GST No. (with Verify), GST Company Email / Contact / Address, if you need a GST invoice
Traveller Details form – Primary Traveller, ID proof, Add More Traveller, Agent Reference and Company GST
💡 Travellers you have booked before are remembered, so you can pick them from the list instead of typing again.
12 Choose What to Do Next
Tick Accept the Terms & Conditions. The buttons below then become active:
Accept the Terms & Conditions, then choose Pay Now, Add More, Quotation, Hold On or Voucher
Pay Now – go to the Payment step and book now (see 2F)
Add More – put this trip in the Shopping Cart and go back to the home page to search for the next trip (see 2H)
Quotation – make a quotation instead of booking (see 2G)
Hold On – keep the vehicle and fare without paying yet (see 2I)
Voucher – shown only when your wallet balance covers the amount. Books at once and pays from your wallet
The Payment Details box on the right shows Booking Amount, Base Fare, Service Charge, Discount, Addon Amount and the Payable Amount.
💡 Fare check: Before Hold On or Voucher, the fare is checked again. If it has changed, a box shows the Old and New fare and you choose whether to continue. The button shows "Checking fare..." while this runs.
💳 2F. Payment
13 Pay for Your Booking
Click Pay Now on the Traveller page to open step 2, Payment.
Payment step – Use Wallet Amount, pay 25% / 50% / the full amount now, then Pay ₹… (or Pay & Book)
Payment Options:
Use Wallet Amount (₹…) – tick to pay from your wallet balance
Pay 25% now, Pay 50% now (rest before the trip starts) or Pay full amount now – choose how much to pay now
Click Pay ₹… (or Pay & Book in the box on the right). Online payment is by card, UPI or net banking through the secure payment gateway
Payment Link – a payment link for a booking can be sent to the traveller, who pays from it
Note: After a successful payment, the Booking Confirmed page opens and the booking voucher is emailed to you. If the payment fails, the booking stays unpaid. You can try again from My Bookings.
📋 2G. Quotation Page
14 Make and Share a Quotation
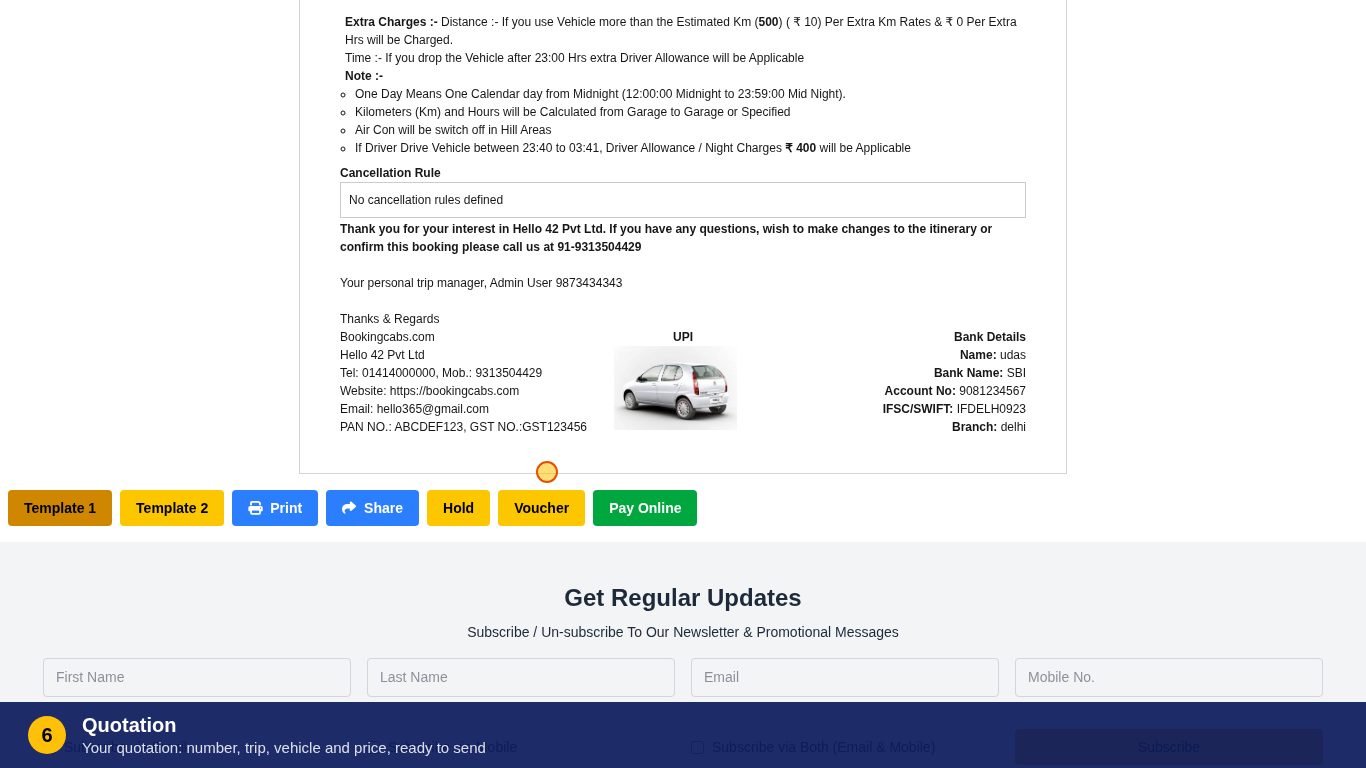
Click Quotation on the Traveller page. The quotation is saved and the Quotation page opens. It shows the trip, the vehicle, the fare, inclusions and exclusions, and the cancellation rules, with your company logo.
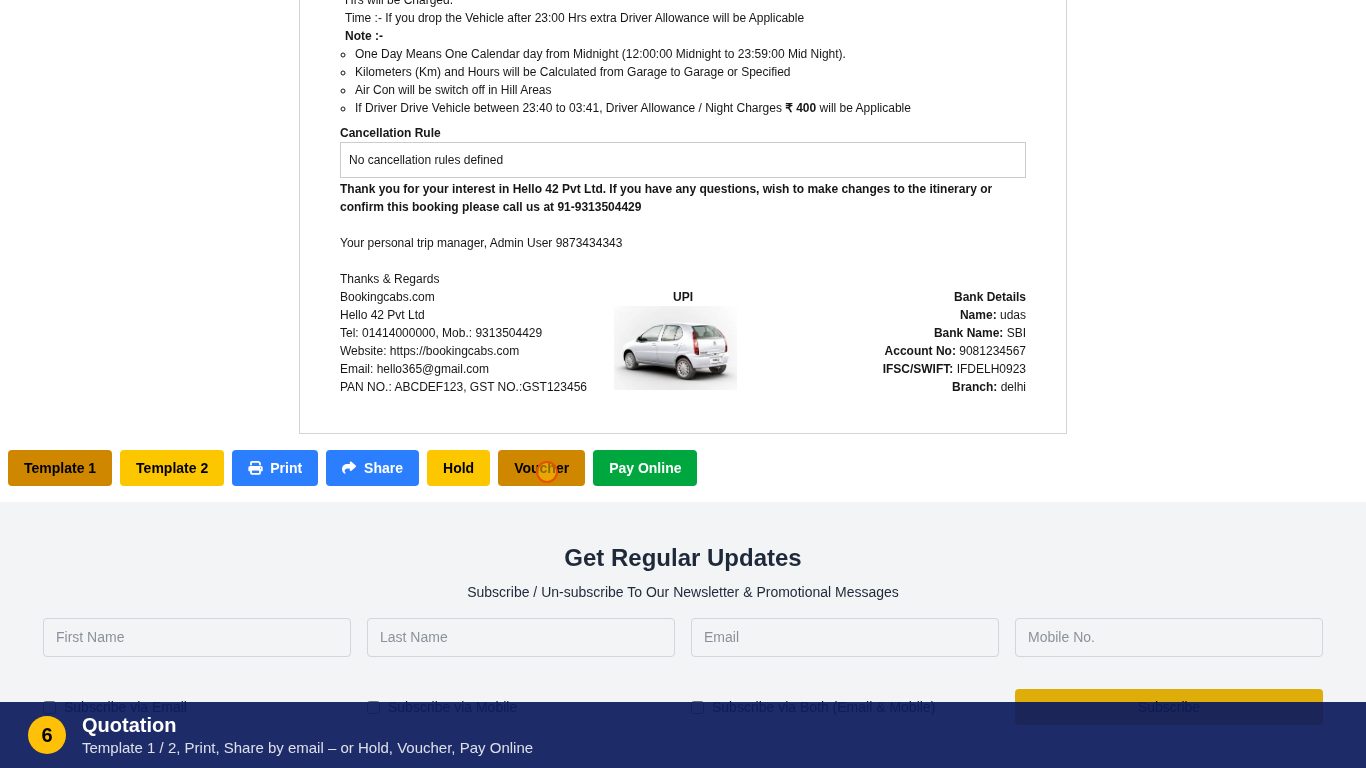
Quotation page – quotation number, trip details and price, with the buttons below
Buttons on the Quotation page:
Template 1 / Template 2 – choose the layout of the quotation
Print – print it, or save it as a PDF
Share – email the quotation to your client
Hold – hold the quotation as a booking without paying yet
Voucher – book it from your wallet balance or credit
Pay Online – pay and book it now
All your quotations are listed under My Account → Quotation → Transport. Open one to print, share or book it.
Note: A quotation more than 1 day old is re-priced when you book it. If the fare has changed, you see the Old and New fare first.
🛒 2H. Shopping Cart & Cart Checkout
15 Shopping Cart – Several Trips in One Booking
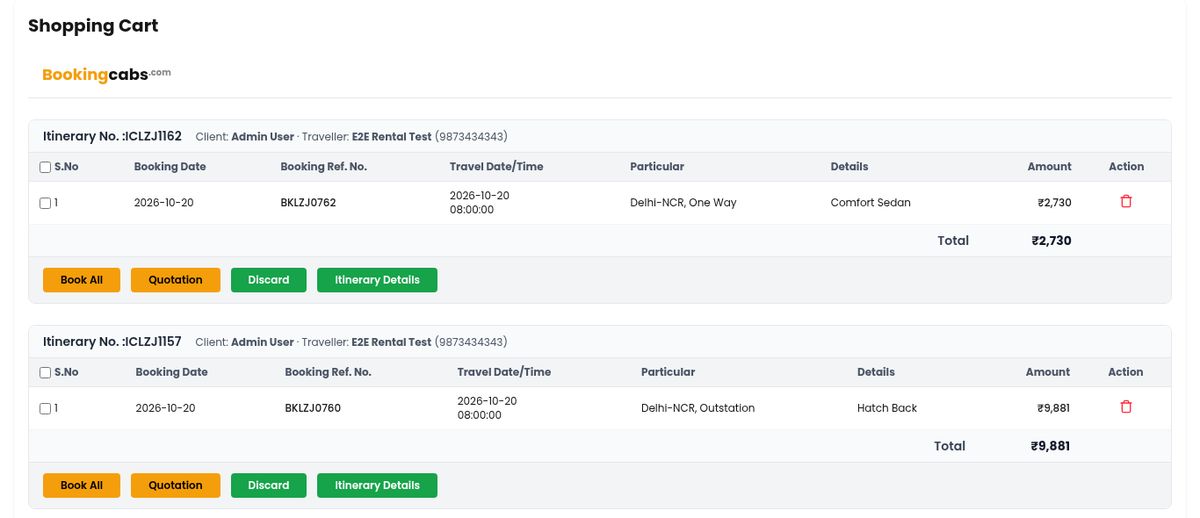
Each time you click Add More on the Traveller page, the trip goes into the Shopping Cart (cart icon in the header). The trips are kept together as one itinerary until you book them. Example: an airport pickup, a 2-day local rental and an outstation trip.
Shopping Cart – each itinerary with its trips, Total and the Book All / Quotation / Discard / Itinerary Details buttons
Shopping Cart buttons:
Book All – book every trip in the itinerary
Book Selected (n) – appears when you tick some (not all) trips of an itinerary; books only those
Quotation – see one quotation for all the trips; click Save to Quotations to keep it
Discard – remove the whole itinerary from the cart
Itinerary Details – the full day-by-day itinerary, with Print and Share
🗑 Remove item – remove one trip
Note: If you add a trip on a date that is already in the cart, you are asked to confirm, so you don't book the same day twice by mistake.
16 Cart Checkout
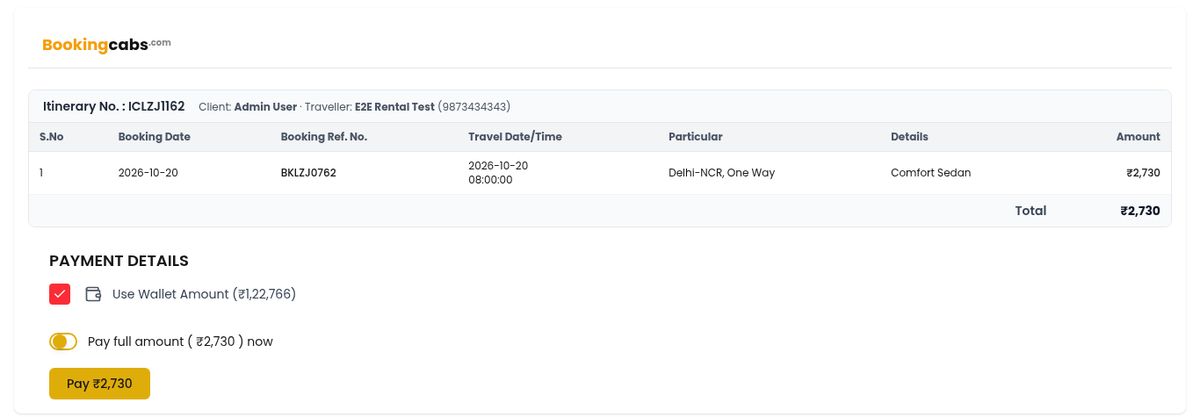
Book All or Book Selected opens the Checkout page. It lists the trips you are booking with the Total, and a Payment Details box:
Cart Checkout – trips being booked, Total, Use Wallet Amount and Pay ₹…
Use Wallet Amount (₹…) – available when your wallet covers the total; otherwise it shows Insufficient balance
Pay full amount now – pay online
Click Pay ₹… to book. Use Back to Cart to make changes first
💡 If the price of a trip changed after you added it, a Fare has changed box shows each Field with its Old and New value. Accept it to continue, or click Reject.
⏱️ 2I. Hold Page & Booking Confirmed
17 Hold On – Keep the Booking Without Paying
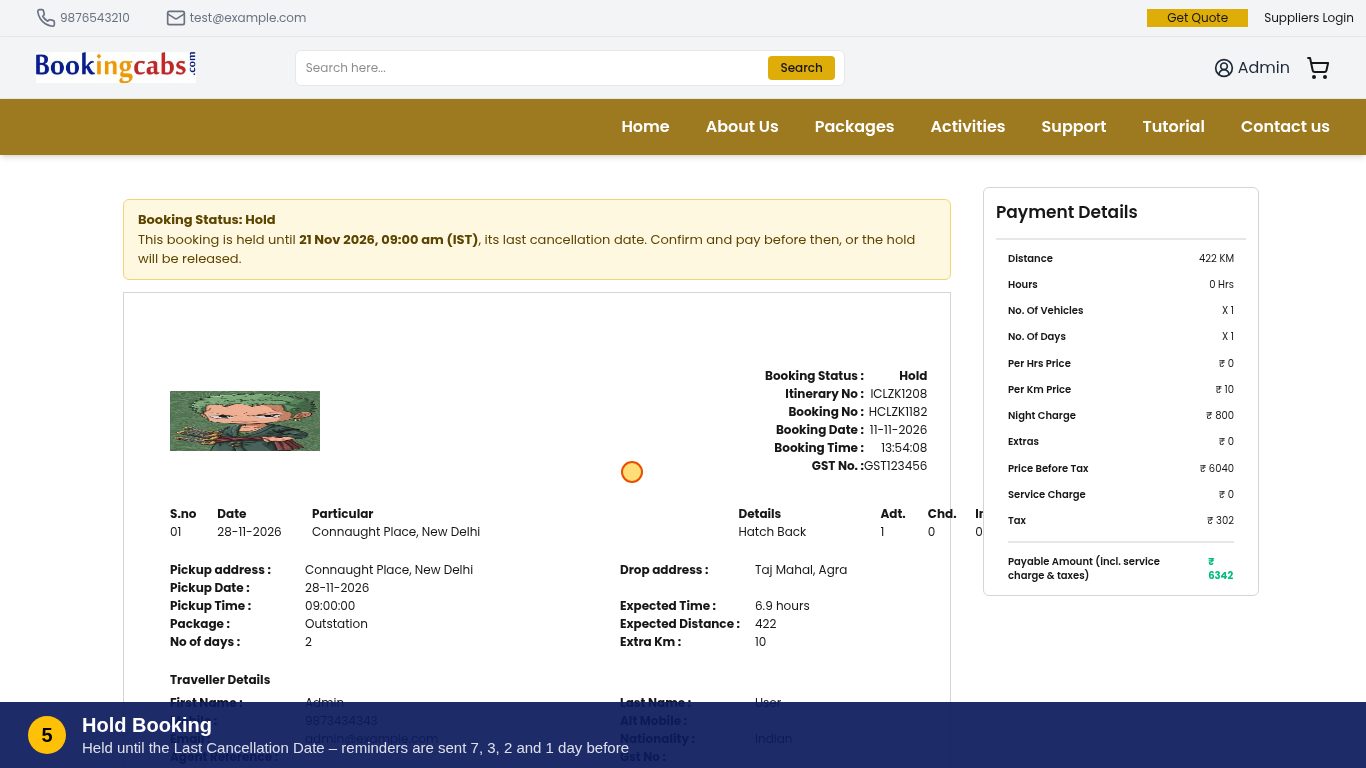
Click Hold On on the Traveller page. You get a Hold reference (it starts with HCL), the Hold page opens, and a Hold voucher is emailed to you.
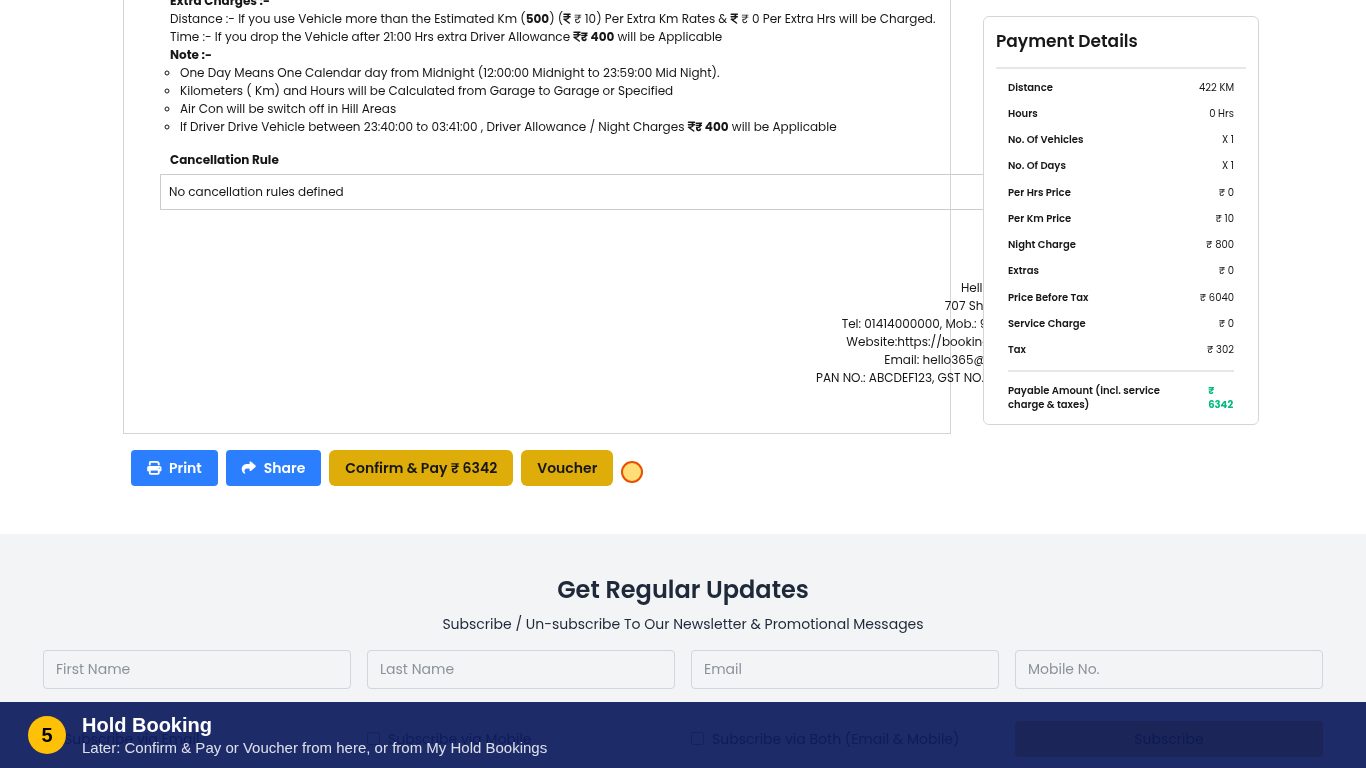
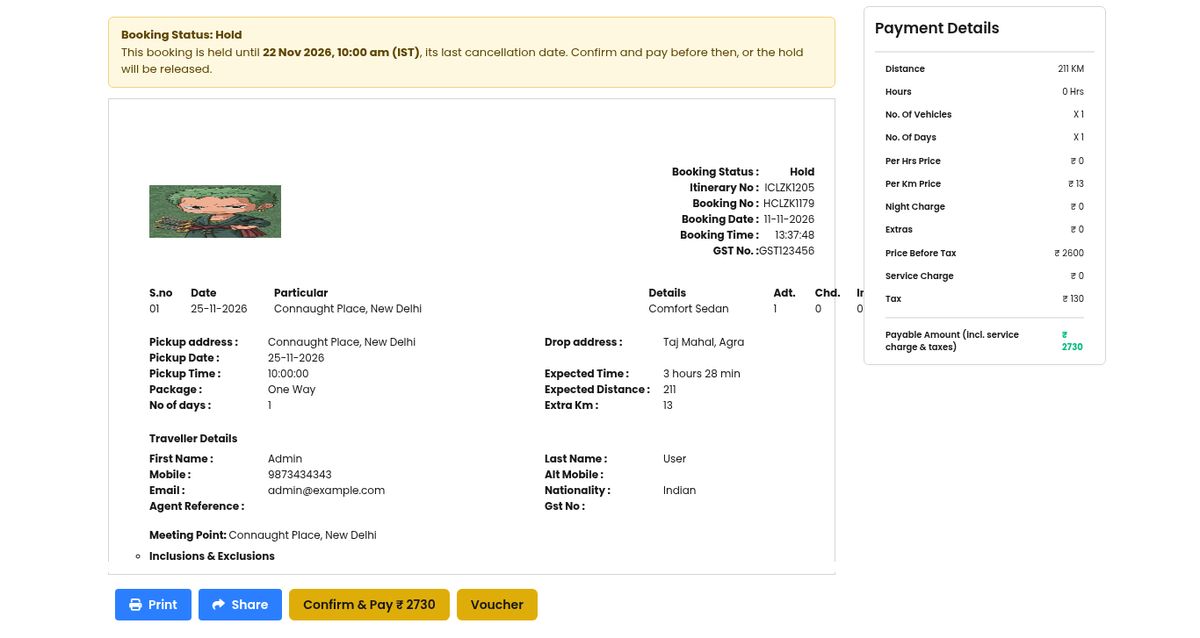
Hold page – "Booking Status: Hold" banner with the release date, the hold voucher and Print / Share / Confirm & Pay / Voucher
The Hold page:
Looks like the booking voucher, with status Hold and a banner showing the release date
The release date is the Last Cancellation Date: your pickup time minus the longest free-cancellation window of the fare
Print / Share – print the hold voucher or send it by email
Confirm & Pay ₹… – pay the amount due and confirm the booking
Voucher – confirm from your wallet balance or credit, when it covers the amount
Once confirmed, the booking gets a Booking reference (it starts with BKL)
Reminders & release: Reminder emails are sent 7, 3, 2 and 1 day before the release date. A hold that isn't confirmed by then is released automatically. You can always find your holds under My Account → My Hold Bookings.
18 Booking Confirmed
After payment or Voucher, the Booking Confirmed page shows your booking reference. The booking voucher, with the trip, the traveller, the fare and the Last Cancellation Date, is emailed to you. If Share Detail to Traveller was ticked, it is also sent to the traveller. The driver and vehicle details are sent before pickup.
💡 Travel Agents: Bookings made from your agent account show up in your Dashboard with your commission details.
03
Request for Quotation – Get Quote
The Get Quote feature allows you to request a custom quotation directly from the homepage without going through the standard booking search. This is ideal for complex itineraries or group travel.
1 Find the Get Quote Button
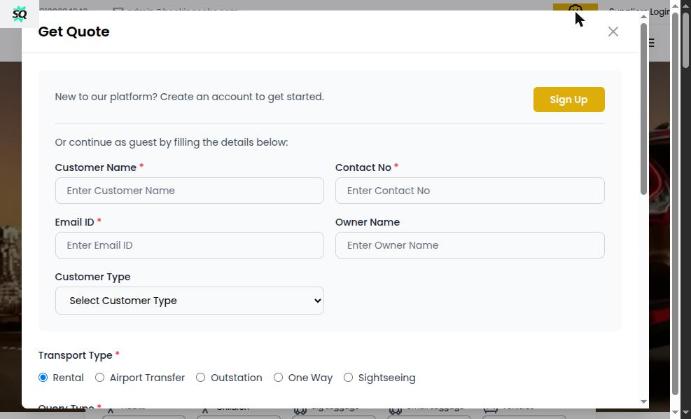
The yellow Get Quote button is in the top bar of every page, next to Suppliers Login. Click it to open the Get Quote form.
Note: On a desktop the button shows the words "Get Quote". On a mobile or tablet it is a small yellow % badge icon in the same place.
2 Get Quote Form – Customer Information
The Get Quote modal first asks for your customer and contact details. New users are prompted to sign up, or you can continue as a guest:
Get Quote modal – Customer Info: Name, Contact, Email, Customer Type, Transport Type
Customer Information Fields:
Customer Name * – Full name of the customer
Contact No * – Mobile number
Email ID * – Email address for receiving the quote
Owner Name – Name of the agent/owner (if applicable)
Customer Type – Select from dropdown (Individual, Corporate, Travel Agent, etc.)
Transport Type * – Select one: Rental, Airport Transfer, Outstation, One Way, Sightseeing
3 Get Quote Form – Travel Details
After selecting Transport Type, the form expands with the travel-specific fields:
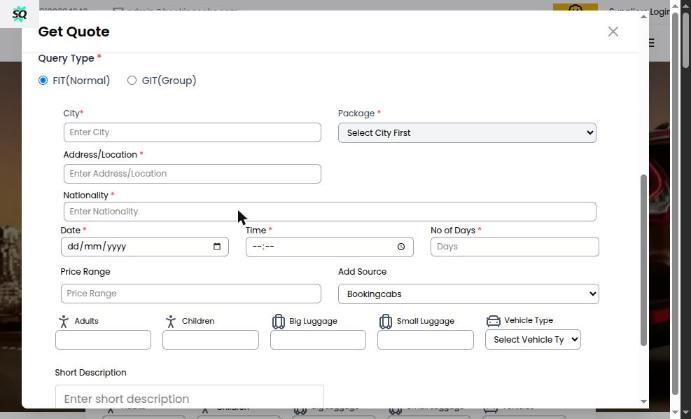
Get Quote modal – Query Type, City, Package, Address, Nationality, Date, Time, pricing fields
Travel Details Fields:
Query Type * – FIT (Normal/Individual Travel) or GIT (Group Inclusive Tour)
City * – Select city from autocomplete
Package * – Select package type (loads after city selection)
Adults, Children, Big Luggage, Small Luggage – Passenger & luggage count
Vehicle Type – Preferred vehicle category
4 Add Description & Submit the Quote Request
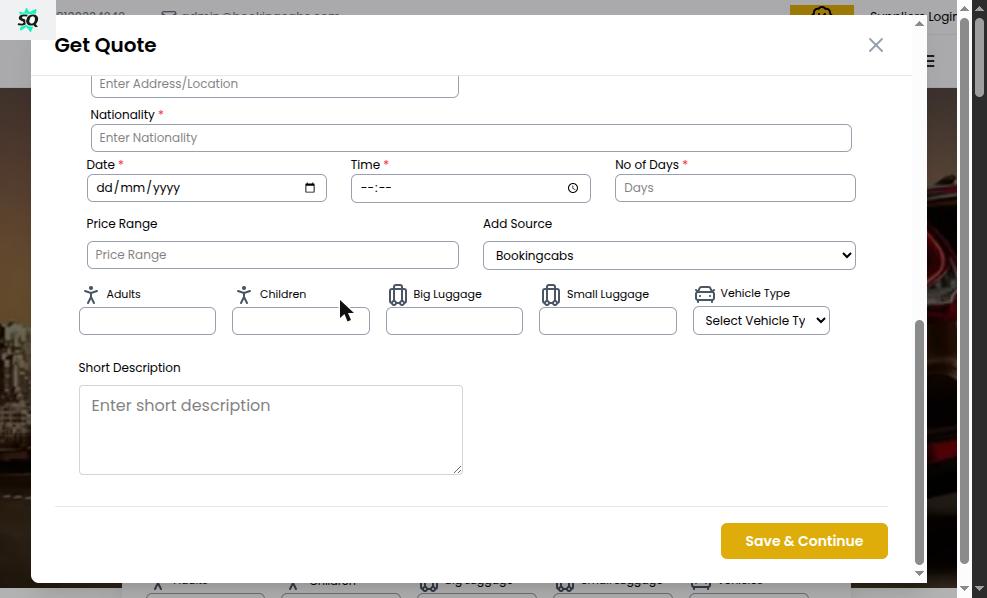
At the bottom of the form, add any special requirements in the Short Description field, then click Save & Continue to submit your quotation request.
Get Quote modal bottom – Short Description field and Save & Continue button
What happens after submission:
Your quotation request is submitted to the Bookingcabs.com team
A Relationship Manager will review your request
You receive a detailed quotation via email within the agreed timeframe
Travel Agents can track the quotation status in their Dashboard
Once approved, the quotation can be converted to a confirmed booking
💡 For Travel Agents handling FIT/GIT groups, using the Get Quote form ensures you receive customized pricing with agent commission included.
04
Dashboard & Relationship Manager
The Dashboard is your control center for managing all bookings, quotations, and client relationships. Access it after logging in at bookingcabs.com/login.
1 Login to Access the Dashboard
Navigate to https://www.bookingcabs.com/login and enter your registered email and password. You can also use Login with OTP for quick access via your registered mobile number.
Login Options:
Login with Password – Enter email + password
Login with OTP – Receive OTP on registered mobile, enter to log in
Note: After registration, you will receive your login credentials via email. Contact test@example.com or call 9876543210 if you need login assistance.
2 Your Account Menu
After you log in, your name appears in the header. Click it to open the account menu:
My Account – Opens your Dashboard
Relationship Manager – Your assigned contact at Bookingcabs.com
Wallet ₹… – Your current wallet balance
Contact Us, Refer & Earn, Offer and Compare
3 Dashboard Menu
The Dashboard has a menu on the left. Some items are shown only to company accounts (Corporate / Travel Agent) or to admins:
Dashboard Menu:
📊 Dashboard – Summary of your bookings and recent activity
📋 Quotation → Transport – All cab quotations you have made. Open one to share it or book it
⏰ Cancellation Deadline – Bookings coming up to their last free-cancellation date
🗓️ My Bookings – All your bookings. View the voucher, itinerary, driver details and status
⏳ My Hold Bookings – Your held bookings and their release dates. Confirm & Pay from here
📣 My Complaints – Raise and follow up complaints (see section 5)
👥 User Management – Add Users / Users: people who can book under your company
🧑💼 Staff – Staff, Role Management and Department (company admins)
💰 Finance → Statement of Account – Your payments, bookings and balance
🎫 Membership Package – Your plan and its benefits
✉️ Company Invites – Invite people to join your company account
4 Relationship Manager & Managing Bookings
Click Relationship Manager in the account menu to see your assigned contact person at Bookingcabs.com. Call or email them for help with quotes, group travel or changes to a booking.
From My Bookings you can:
View the itinerary and download the booking voucher
See the driver and vehicle details once a driver is assigned (they are also sent to you before pickup)
Cancel a booking (cancellation charges may apply after the Last Cancellation Date)
Raise a complaint about a booking
5 Contact & Support
For assistance, reach the Bookingcabs.com team through:
Contact Details:
Office: 29-30 D B Gupta Market, Karol Bagh, New Delhi 110005
Phone: 9876543210
Email: test@example.com
Website: bookingcabs.com
05
Complaints, Refer & Earn and Offers
1 Raise a Complaint
Go to My Account → My Complaints and click Raise a Complaint.
Complaint Form:
Booking Reference No. – Optional. Add it if the complaint is about a booking
Category – Choose the type of problem
Subject * and Tell us what happened *
Contact mobile – Only if different from your profile
Each complaint gets a Complaint No. (it starts with CP). The list shows its Status and Last Update. Open a complaint to follow the replies.
2 Refer & Earn
Open Refer & Earn from the account menu. Share your referral link or code with friends. When they sign up with it, you earn Referral Points.
Your points balance is shown on the Refer & Earn page
Click Redeem to use your points. Some redemptions are approved by the Bookingcabs.com team first
3 Offers
Open Offer from the account menu to see the current offers and discount codes.